Pet-Friendly, Apartment-Friendly, and Actually Nice to Look At
Tired of Ugly Plastic Dog Gates?
Most indoor dog gates solve one problem while creating another.
Yes, they help keep your dog out of certain areas — but many of them also make your home feel cluttered, cheap, and awkward to walk through. And if you’ve ever had to step over a tall plastic gate while carrying laundry or coffee, you already know how frustrating that gets.
I ran into the same issue in a small apartment where the kitchen and hallway needed a simple barrier for our dog, but every store-bought gate looked bulky or completely out of place with the rest of the decor.
That’s what inspired this DIY indoor dog gate with door project.
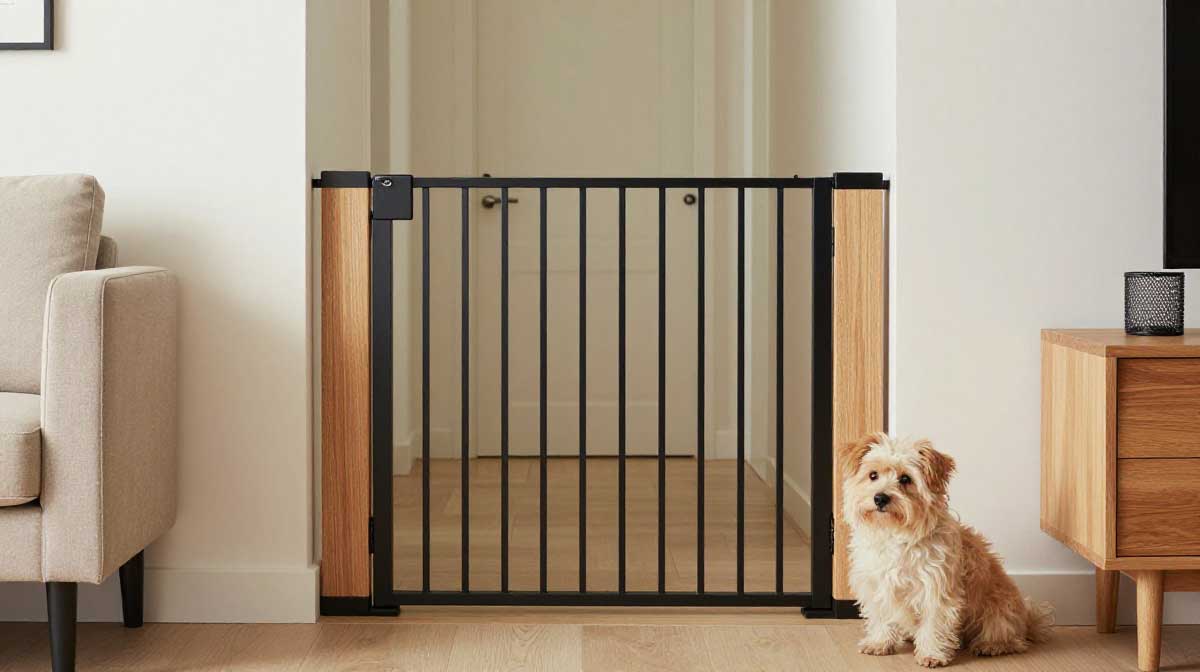
Instead of using flimsy plastic panels, this version uses a simple wooden frame with a functional swinging door that blends much more naturally into modern home interiors. It’s sturdy enough for daily use, beginner-friendly to build, and stylish enough that it doesn’t scream “temporary pet setup.”
Even better, the entire project can usually be completed in under 3 hours for less than $50.
Whether you need a gate for stairs, kitchens, hallways, or apartment entryways, this design works especially well in small spaces. If you are also trying to secure your outdoor backyard on a budget, don’t miss our ultimate guide on Cheap DIY Dog Fence Ideas.
Let’s stop climbing over plastic and build something beautiful together.
Why a Wooden Indoor Dog Gate Works Better in Small Homes

In compact homes and apartments, bulky pet products can quickly overwhelm the space.
A wooden indoor dog gate tends to feel:
- cleaner
- warmer
- more furniture-like
- easier to blend into existing decor
Unlike pressure-mounted plastic gates, a DIY wooden gate also gives you more flexibility with:
- custom sizing
- paint color
- latch placement
- overall style
I also noticed that having an actual door instead of a step-over gate makes daily movement much easier — especially in narrow hallways or busy kitchens.
After using one for a while, it honestly felt less like a pet barrier and more like a natural extension of the home.
Project Overview
| Project Detail | Information |
| Difficulty Level | Beginner-Friendly |
| Estimated Cost | Under $50 |
| Build Time | Around 2–3 Hours |
| Best For | Apartments, Hallways, Kitchens & Stairs |
| Gate Style | Wooden Indoor Dog Gate with Door |
| Recommended Finish | Pet-Safe Paint or Stain |
✅ Planning Checklist Before You Start
Before cutting any wood, spend a little time planning the gate dimensions and safety details properly. As pet parents, our number one priority is ensuring this gate keeps our dogs contained without creating new hazards.
This is especially important if you have:
- puppies
- larger dogs
- dogs that jump
- dogs that chew furniture
A few small adjustments early on can make the gate much safer and sturdier long term. When building your stylish puppy gate for stairs or doorways, keep these non-negotiable rules in mind:
1. Choose the Right Gate Height
The ideal height depends on your dog’s size and personality.
As a general guideline:
- 24 inches works well for most small dogs (like Frenchies or Yorkies)
- 30–36 inches are safer for medium or athletic breeds (like Labradors or Aussies)
- taller gates work better for dogs that tend to jump
One mistake many people make is only measuring the dog’s standing height.
Some dogs can jump surprisingly high once they get excited or curious.
2. Keep the Spindle Spacing Safe
The spacing between wooden slats matters more than most people expect.
If the gaps are too wide, puppies can get their heads stuck between the spindles, which can lead to serious injury.
A safe rule is keeping the spacing:
- around 2 to 2.5 inches maximum
This keeps the gate secure while still allowing airflow and visibility.
3. Use Pet-Safe Materials
Dogs chew things. Especially puppies.
That’s why it’s important to avoid harsh paints or finishes that may contain high VOC chemicals. Never use toxic industrial sealants.
Look for:
- pet-safe paint
- low-VOC stain
- natural wood sealers
If possible, let the gate fully cure outdoors or in a ventilated garage before bringing it inside.
The smell of fresh paint can linger longer than expected in small apartments.
💡 The Heavy-Duty Latch System: Smart dogs can mimic human movements. Avoid simple flip latches that can be nudged upward by a wet nose or a paw. Use a secure gravity latch or a lock installed on the outside of the gate, facing away from the dog.
🛒 Budget Shopping List
One of the best things about this project is that it looks much more expensive than it actually is.
Most materials are easy to find at:
- Home Depot
- Lowe’s
- Amazon
- local hardware stores
| Item Description | Estimated Price | Suggested Source |
| Pine Boards (1×2 & 1×3 Lumber) | $15 | Local Hardware Store |
| Wooden Dowels or Square Spindles | $12 | Home Depot |
| Matte Black Hinges & Flip Latch | $8 | Amazon |
| Pocket Hole Screws & Wood Glue | $5 | Walmart |
| Pet-Safe Paint or Stain | $10 | Lowe’s / Amazon |
| Estimated Total | Around $50 | Budget-Friendly DIY |
💡 Money-Saving Tip:
If you have leftover plywood or scrap wood from previous DIY projects, you can cut them into narrow strips for the center spindles instead of buying new dowels. That small change alone can reduce the total project cost noticeably.
Tools You’ll Need
You don’t need a professional woodworking setup for this project.
Most beginner DIY tools will work perfectly fine:
- Electric drill
- Measuring tape
- Sandpaper
- Pocket hole jig (optional but helpful)
- Paint brush or foam roller
- Saw or pre-cut lumber
- Clamps
- Safety glasses
Many hardware stores can also cut the wood for you before purchase, which makes the build much easier for beginners.
🛠️ How to Build a DIY Indoor Dog Gate with Door
Step 1: Measure the Opening Carefully
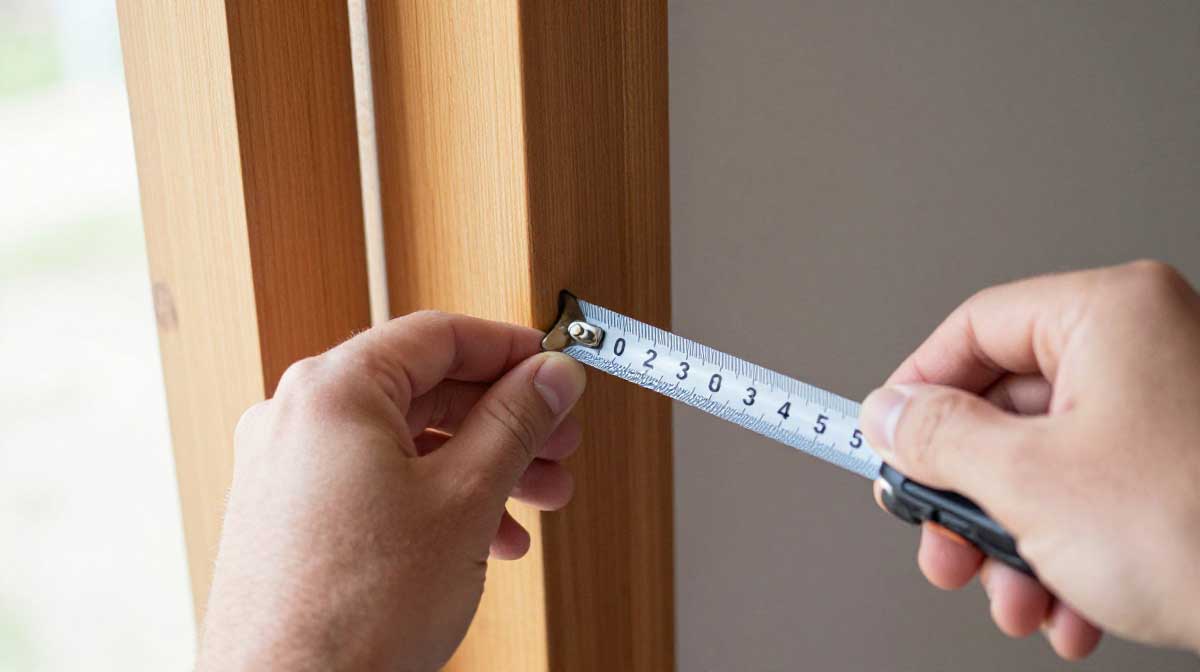
Start by measuring the hallway, doorway, or stair opening where the gate will go.
For swinging gates, subtract about:
- 0.5 inch
…to leave enough clearance for the hinges and smooth door movement.
Decide on the height (24 inches for small dogs, 36 inches for large dogs).
👉 I highly recommend measuring twice before cutting anything. Small errors become very noticeable once the gate starts opening and closing.
Step 2: Cut and Sand the Wood
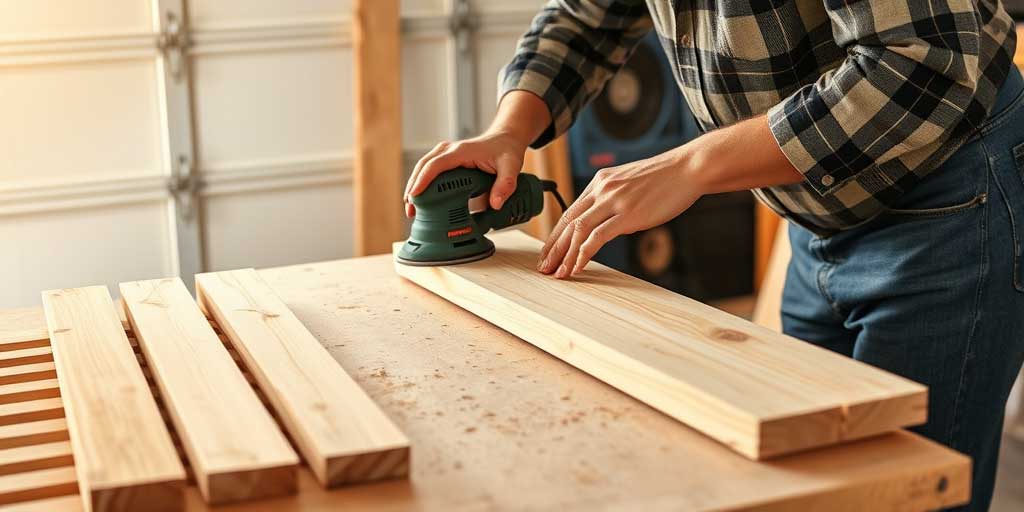
Once the measurements are finalized, cut the frame pieces and spindles to size.
Then sand every surface thoroughly. Sand every surface thoroughly with 120-grit sandpaper to remove sharp edges and splinters
This step matters more than people think because rough edges can:
- scratch your dog
- snag fur
- chip paint later
Focus especially on smoothing:
- corners
- spindle edges
- lower sections dogs may chew or rub against
👉 Even inexpensive pine looks significantly better after proper sanding.
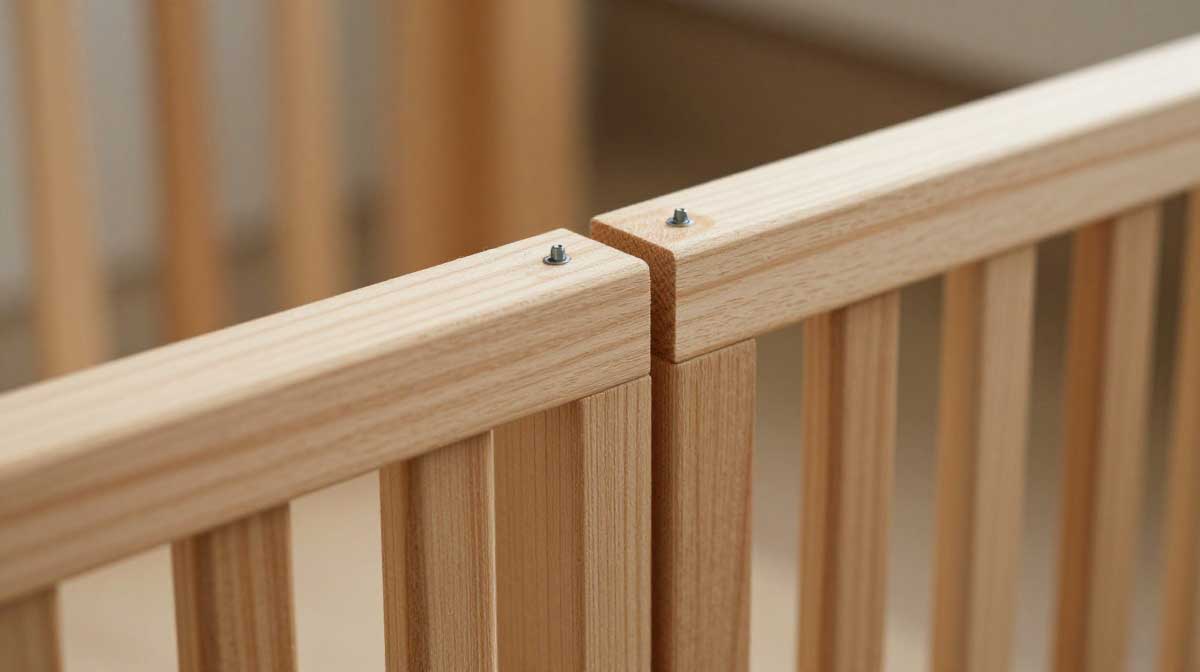
Step 3: Build the Main Frame and Door Section
Now it starts looking like a real gate.
Create:
- the outer support frame
- and the smaller swinging door section separately
Pocket hole screws work especially well here because they create cleaner hidden joints without visible hardware on the front side.
👉 If you don’t own a pocket hole jig, standard wood screws still work fine — just pre-drill pilot holes first to avoid splitting the wood.
Step 4: Install the Wooden Spindles
The center slats help strengthen the gate while keeping it visually open.
Attach each spindle using:
- wood glue
- finish nails or brad nails
Spacing consistency matters here.
👉 A quick trick that helps: use a scrap wood spacer block between each spindle while assembling. It keeps everything evenly aligned without constantly measuring.
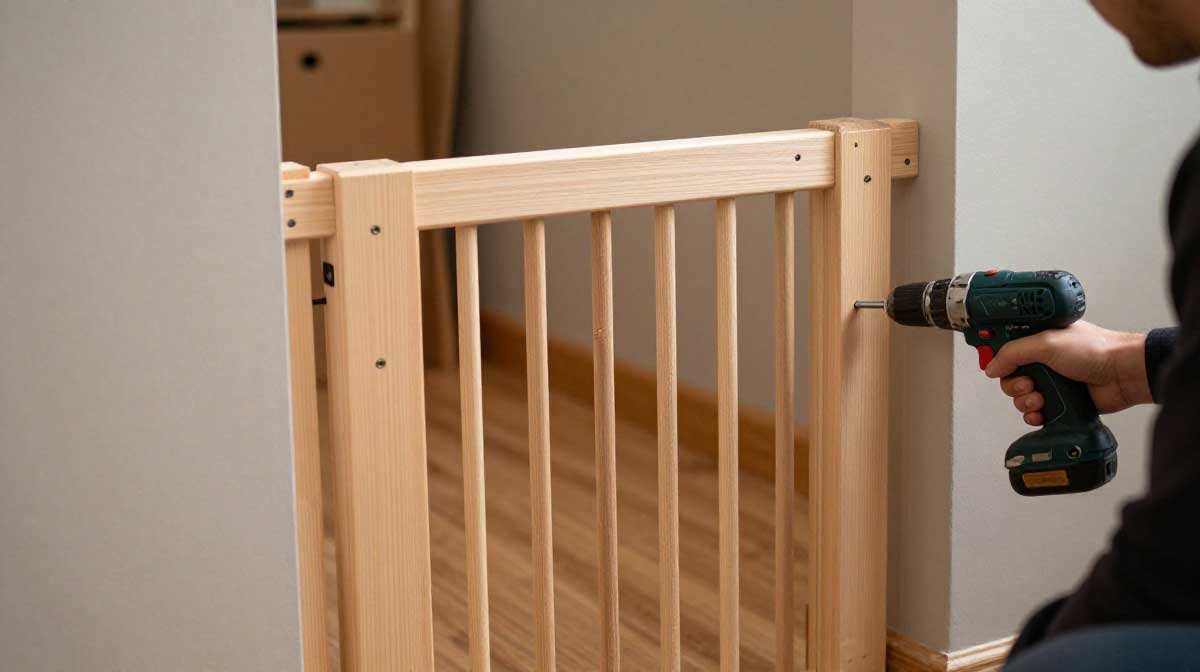
Step 5: Install the Hinges and Safety Latch
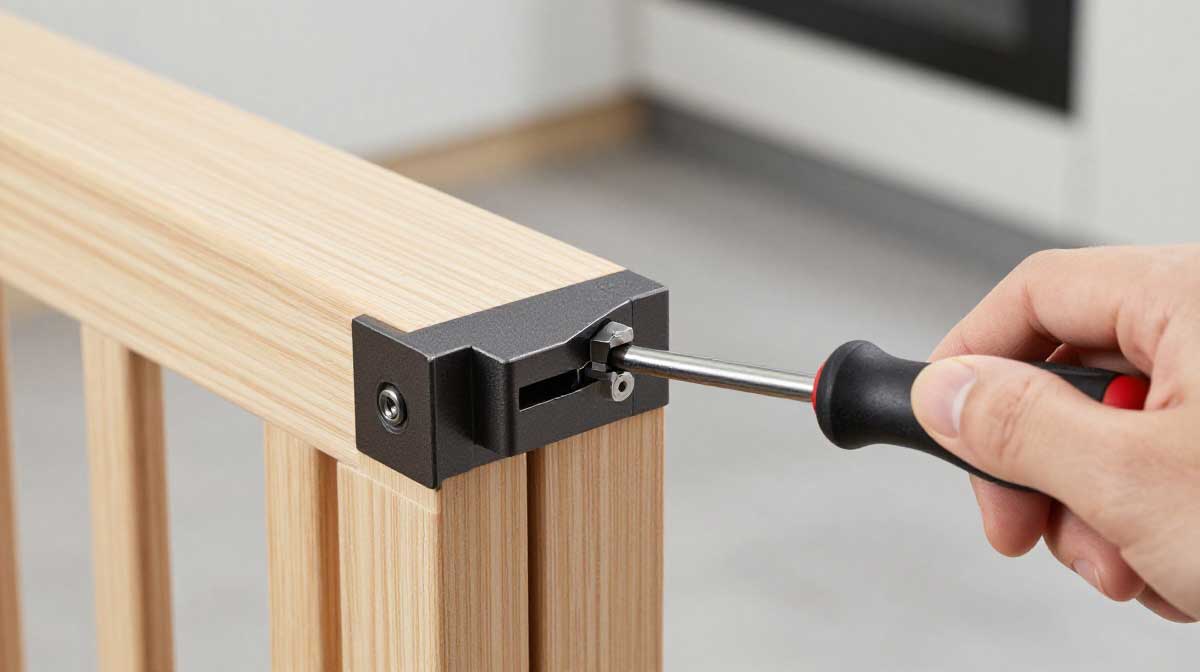
This step makes the gate much more practical for everyday use.
Attach the hinges securely to the frame first, then install the latch on the outer side where dogs can’t easily reach it.
Gravity latches or flip latches usually work best because:
- they’re simple
- durable
- harder for clever dogs to open
One mistake I made during an earlier build was using a lightweight plastic latch. It worked for about two weeks before the dog learned how to push through it.
👉 Metal hardware is absolutely worth the small extra cost.
Step 6: Paint or Stain the Gate
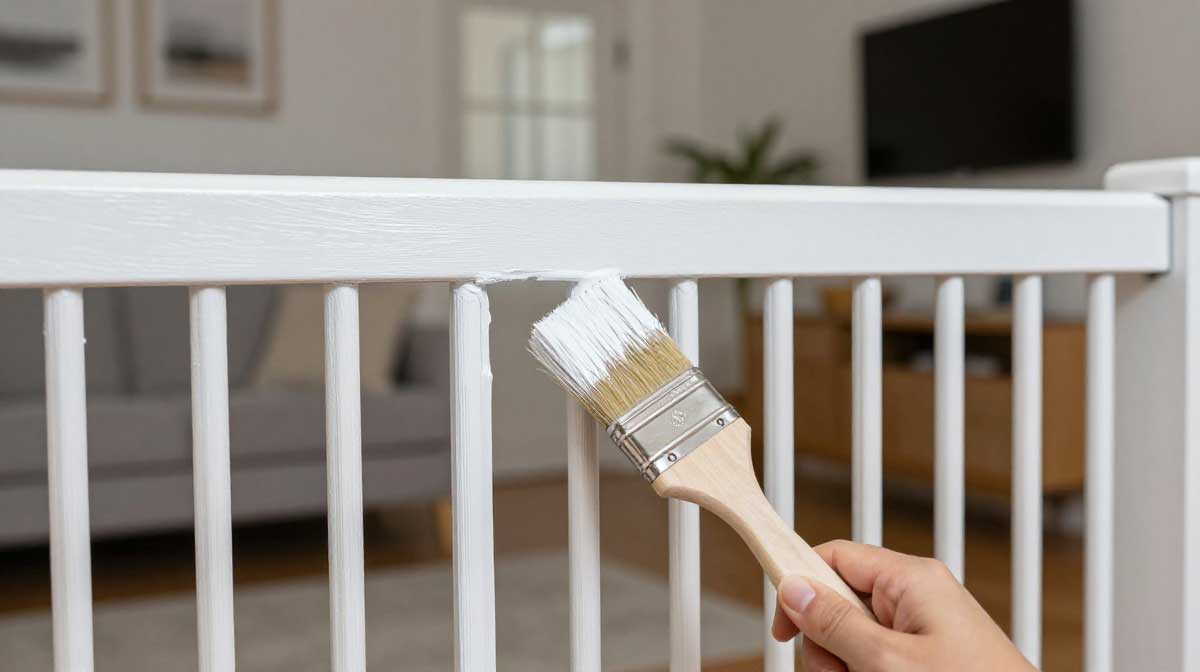
At this stage, the project finally starts feeling like actual furniture instead of leftover lumber.
Soft neutral finishes tend to work best indoors, especially in apartments or smaller homes.
Popular choices include:
- classic white
- matte black
- warm oak stain
- charcoal grey
- soft sage green
For modern interiors, matte finishes usually look more high-end and hide scratches better over time.
👉 Allow the paint or stain to dry fully before letting pets near the gate.
🎨 Easy Ways to Make the Gate Look More Stylish
One advantage of DIY pet gates is that you can customize them to match your home decor instead of settling for generic plastic designs.
A few small upgrades can make the gate look much more intentional.
1. Use Matte Black Hardware
Simple black hinges and latches instantly create a more modern farmhouse or minimalist look.
This works especially well with white or natural wood finishes.
2. Add Decorative Trim
Thin trim pieces along the outer frame can make the gate look more custom-built and less like a basic barrier.
Even simple square trim can make a huge visual difference.
3. Match the Gate Color to Nearby Furniture
If your apartment already has warm wood tones or black accents, using similar finishes helps the gate blend naturally into the room.
This prevents it from feeling visually distracting.
If your apartment already has warm wood tones or black accents, using similar finishes helps the gate blend naturally into the room. This prevents it from feeling visually distracting. In fact, matching your pet fixtures with your core furniture is a classic trick we also recommend in our guide on 12 Clever Small Kitchen Island Ideas to make tight spaces feel unified and intentional.
⚠️ 4 Common DIY Dog Gate Mistakes to Avoid
To save yourself time, money, and structural failure, make sure to avoid these common beginner pitfalls that many pet parents overlook:
1. Using Cheap Plastic Latches
Using cheap plastic locks is a recipe for disaster. When a larger dog jumps or paws at the gate out of pure excitement, a plastic latch will snap instantly. Always invest a few extra dollars in a durable, heavy-duty matte black steel gravity latch.
2. Ignoring the Bottom Clearance Gap
Never leave a gap wider than 2 inches between the floor and the bottom rail of your gate. Small breeds or curious puppies will try to squeeze underneath, which poses a serious risk of them getting painfully stuck.
👉 Skipping Bottom Support Feet: for freestanding gates, support feet are essential. Without them, the gate can tip forward surprisingly easily.
3. Leaving Raw Wood Unsealed
Unprotected softwood can splinter, stain, or get damaged quickly if your dog chews it. If they ingest those toxic chips, it can lead to chronic health issues.
Always use a protective pet-safe finish. Stick to Zero-VOC options instead. Using chemical-heavy stains (Heavy Industrial Lacquer) or traditional wall paint can be dangerous.
4. Installing Hinges Directly into Drywall
Drywall alone usually isn’t strong enough for repeated gate movement.
If you attach your gate hinges directly into drywall without using plastic anchors or drilling straight into a wooden wall stud, the constant swinging motion will tear the screws right out. This leaves you with a sagging gate and an ugly hole in your wall within weeks.
Whenever possible:
- anchor into wall studs
- or use proper wall anchors
This prevents loosening and wall damage later.
❓ Frequently Asked Questions
How high should a dog gate be for a Golden Retriever?
For large, athletic breeds like Golden Retrievers, German Shepherds, or Boxers, your dog gate should be at least 32 to 36 inches tall to prevent them from jumping over it when they get excited.
Can I build this dog gate without drilling into the wall?
Yes! You can convert this design into a freestanding zig-zag gate by building 3 separate wooden panels and connecting them with dual-action folding hinges. Simply add wide wooden “T-feet” to the bottom panels for rock-solid stability.
What is the safest paint for indoor pet gates?
Always look for paints labeled as Zero-VOC or Milk Paint. Popular brands like Behr Premium Plus or Benjamin Moore Eco Spec are excellent, non-toxic choices that won’t harm your furry best friend if they happen to chew on the wood.
Is a wooden dog gate better than plastic?
Wooden gates are often sturdier, more customizable, and visually better suited for home interiors compared to bulky plastic gates.
Conclusion
A DIY indoor dog gate with door is one of those projects that solves a practical problem while still making your home feel more polished and intentional.
Instead of relying on bulky plastic barriers that clash with your decor, you end up with something that actually blends into the space and feels custom to your home.
What I personally like most about this project is how functional it feels day to day. The swinging door makes moving around much easier, especially in smaller apartments where constantly stepping over gates becomes annoying fast.
And honestly, once the gate is painted and installed, it barely feels like a pet product anymore. It simply becomes part of the room.
Now that your pet gate is ready, it’s time to upgrade other areas of your home. Check out our latest project on building a budget-friendly DIY Rolling Kitchen Island Under $100 to make your cooking area just as functional as your pet setup!
Royan Abdillah is a home improvement enthusiast and interior design consultant with over 9 years of experience in the industry. Passionate about blending aesthetics with functionality, Royan Abdillah specializes in unique DIY furniture and pet-friendly home solutions. Through this blog, Royan Abdillah aims to help homeowners create beautiful, personalized spaces on a budget.