
Your bathroom has plenty of length, yet you still turn sideways to get past the vanity. Open a drawer, and the walkway disappears. Step out of the shower, and the door is right where you need to stand.
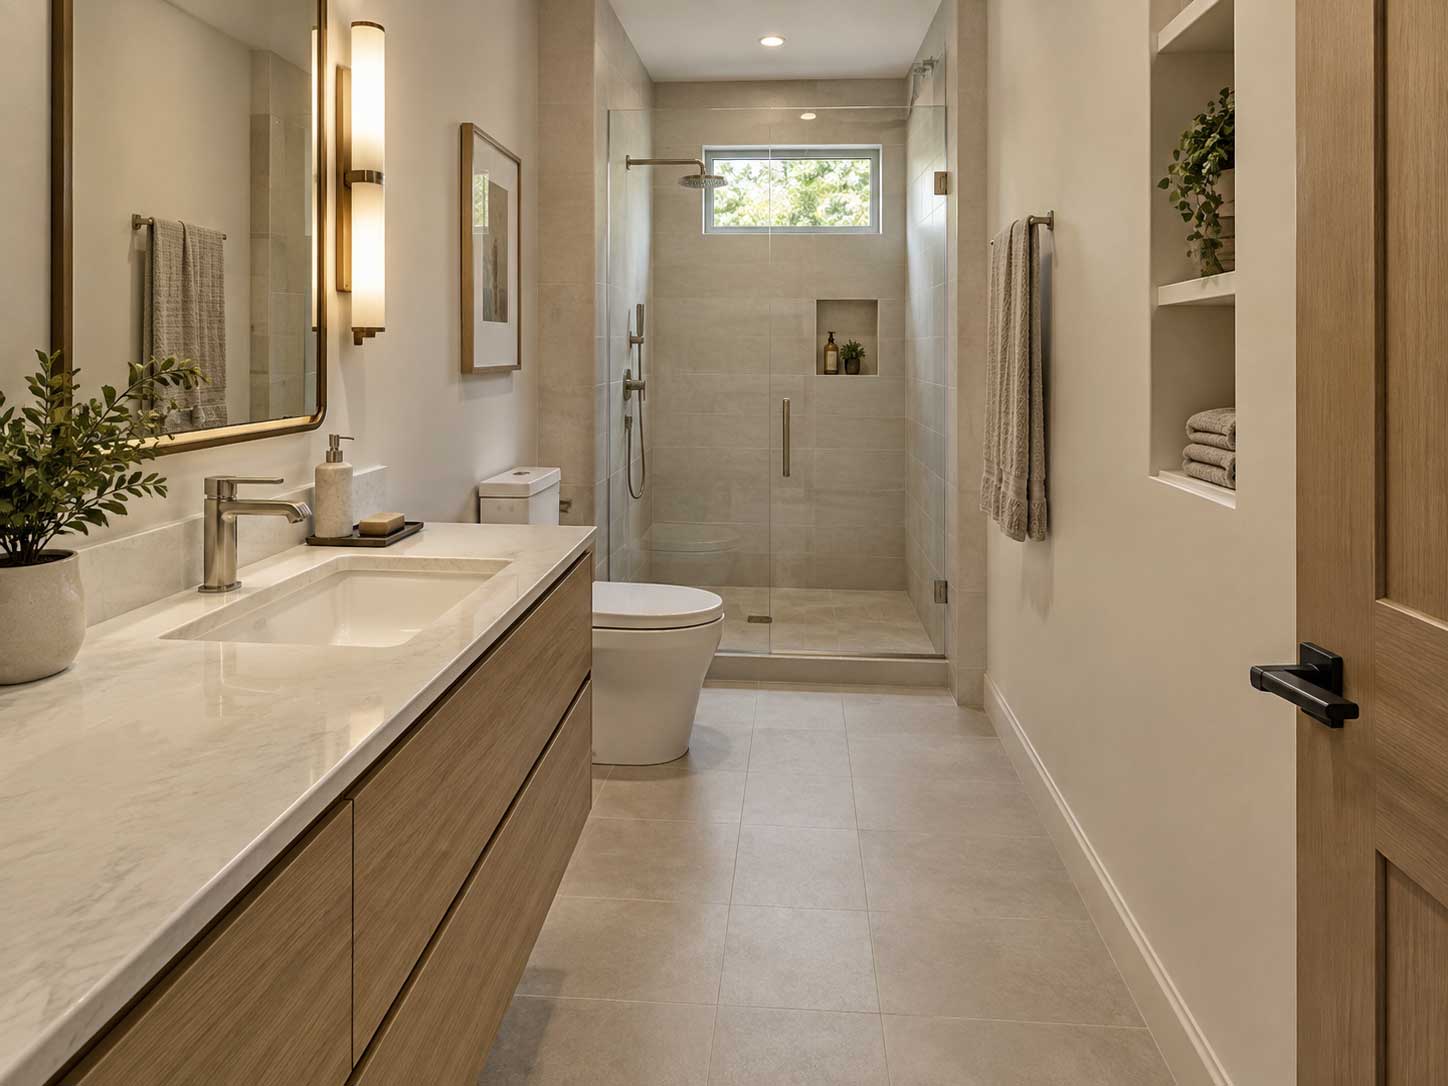
These everyday frustrations often come down to where fixtures sit and how much space they leave for movement. Choosing a long narrow bathroom layout starts with understanding those relationships before committing to a new sink, tub, or shower.
The right arrangement depends on your room’s width, entrance position, and existing plumbing, along with what your household needs. A shower-only bathroom offers different possibilities from one where a bathtub is essential.
Below, you’ll find five practical layouts, the conditions that suit each one, and the trade-offs to consider. Start by comparing them with your own room, then narrow the options to the arrangements that make your daily routine easier.
What Is the Best Layout for a Long Narrow Bathroom?
A single-wall arrangement or a shower across the far end is often a useful starting point for a long narrow bathroom layout. Keeping the vanity and toilet along one side can preserve a continuous walkway, while an end-wall shower places the bathing area beyond the main circulation space.
Neither option suits every room. A doorway halfway along a long wall may call for a different arrangement, and keeping a bathtub can change where the other fixtures fit.
The priority is usable space: somewhere to stand at the basin, reach the toilet, and enter the shower comfortably. Visible floor beneath a floating vanity may make the room feel more open, but it does not increase the clearance between fixtures. Choose an arrangement around those everyday movements first.
Measure These Details Before Choosing a Layout
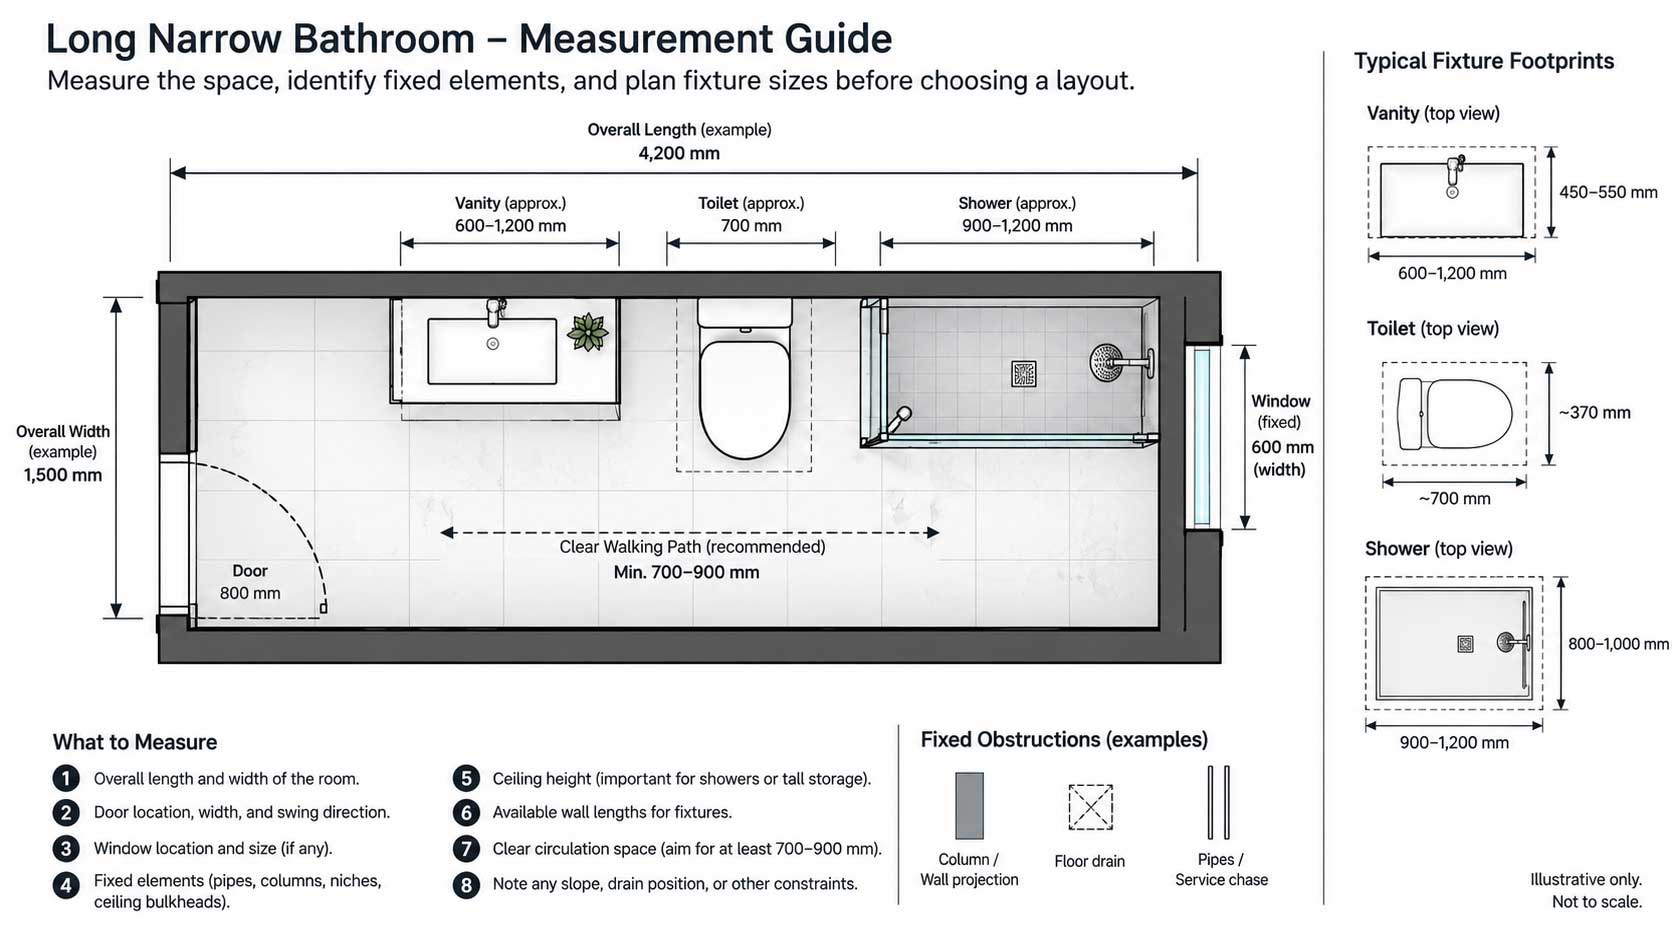
A simple sketch helps you compare layouts against the room you actually have. Include the following measurements and notes before choosing fixtures.
Map the Room, Door, and Windows
Record the room’s internal length and width, noting whether planned wall finishes will change those dimensions. Mark the entrance position, door width, and swing direction. For windows, record their width, distance from adjacent corners, and sill height.
Include boxed-in pipes, columns, and sloping ceilings where present. These details can rule out positions that look workable on an empty rectangle.
Check Fixture Depth and Existing Plumbing
Measure how far each fixture projects from the wall, as well as its width. For a vanity, note the additional reach of open drawers or cabinet doors.
Mark known water supply and waste connection locations. If you cannot identify them, leave a note for your installer rather than guessing. Keeping fixtures nearby may simplify some work, but the existing pipework still needs assessment.
Decide What the Bathroom Must Include
Separate essentials from preferences. Is a bathtub necessary? How much everyday storage do you need? Does anyone require particular access features?
Keep this checklist beside your sketch:
- Room dimensions and fixed obstructions.
- Door and window positions.
- Fixture sizes and opening movements.
- Known plumbing connections.
- Household requirements.
Use manufacturer specifications for shortlisted fixtures, and have the proposed plan checked against applicable local requirements before installation.
Compare These 5 Long Narrow Bathroom Layout Ideas
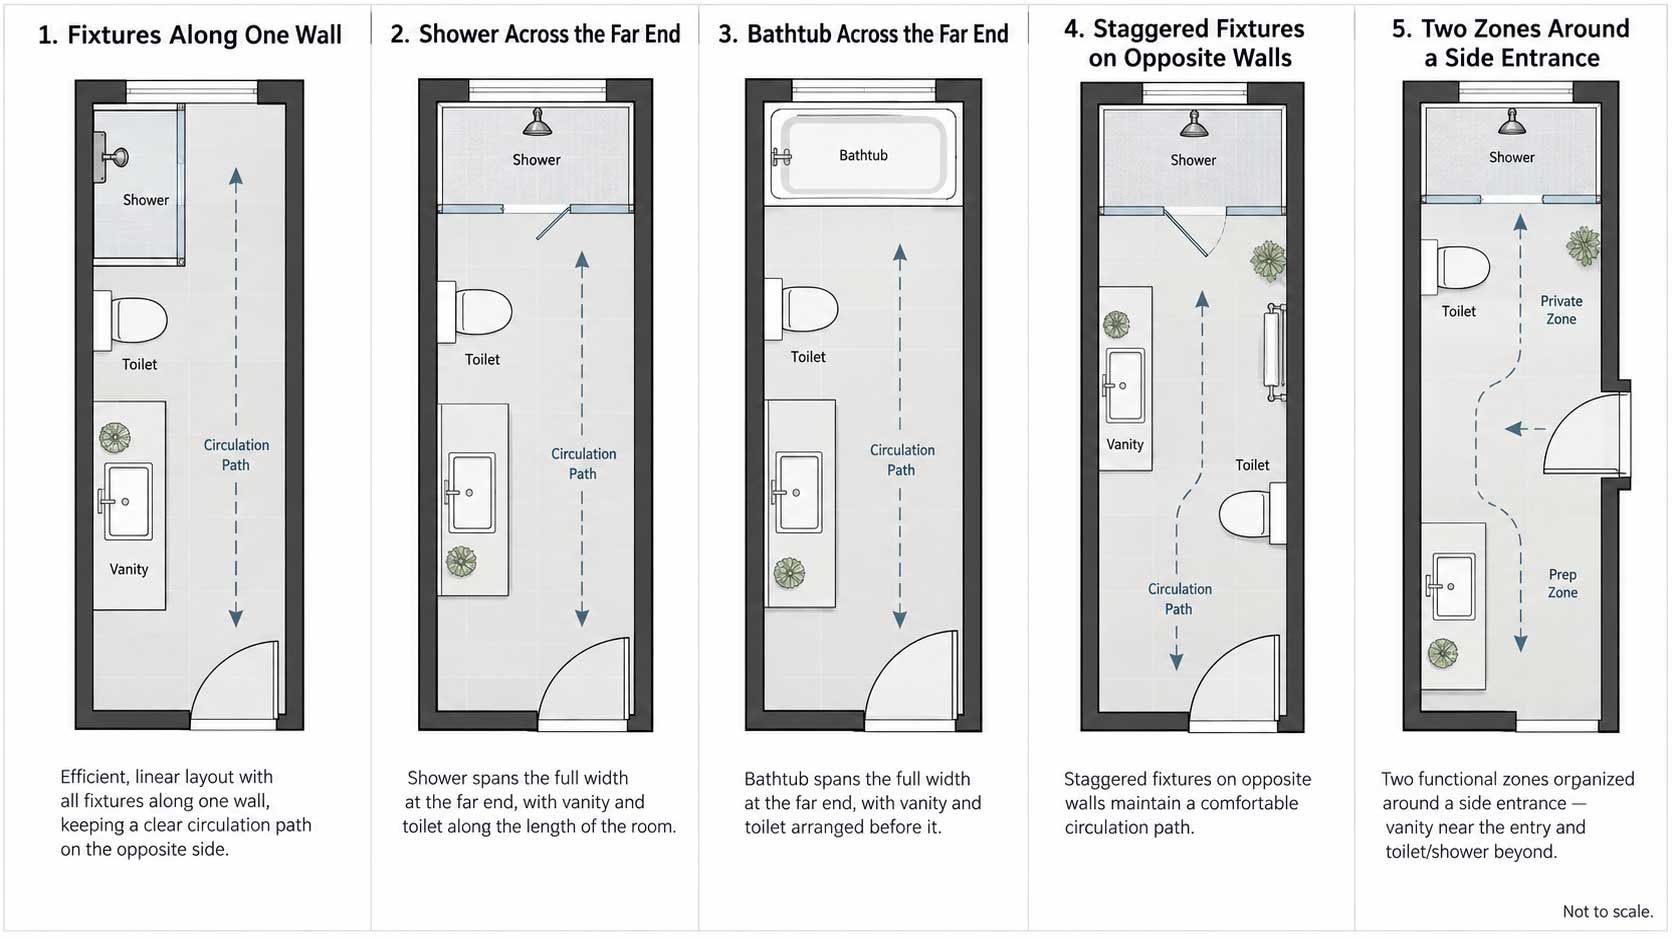
Use this comparison to shortlist arrangements that match your room’s shape and entrance position. Each option solves a different planning problem, but introduces a trade-off worth checking.
Layout Worth considering when… Main trade-off Fixtures along one wall One long wall can accommodate the main fixtures Limited wall space for additional storage Shower across the far end The end wall suits a shower enclosure Windows may complicate placement Bathtub across the far end The finished width accommodates your chosen tub Less flexibility for other fixtures Fixtures staggered on opposite walls The room is wide enough for an offset arrangement Potential pinch points Two zones around a side entrance The doorway sits along a long wall Both routes need unobstructed access
1. Keep Fixtures Along One Wall
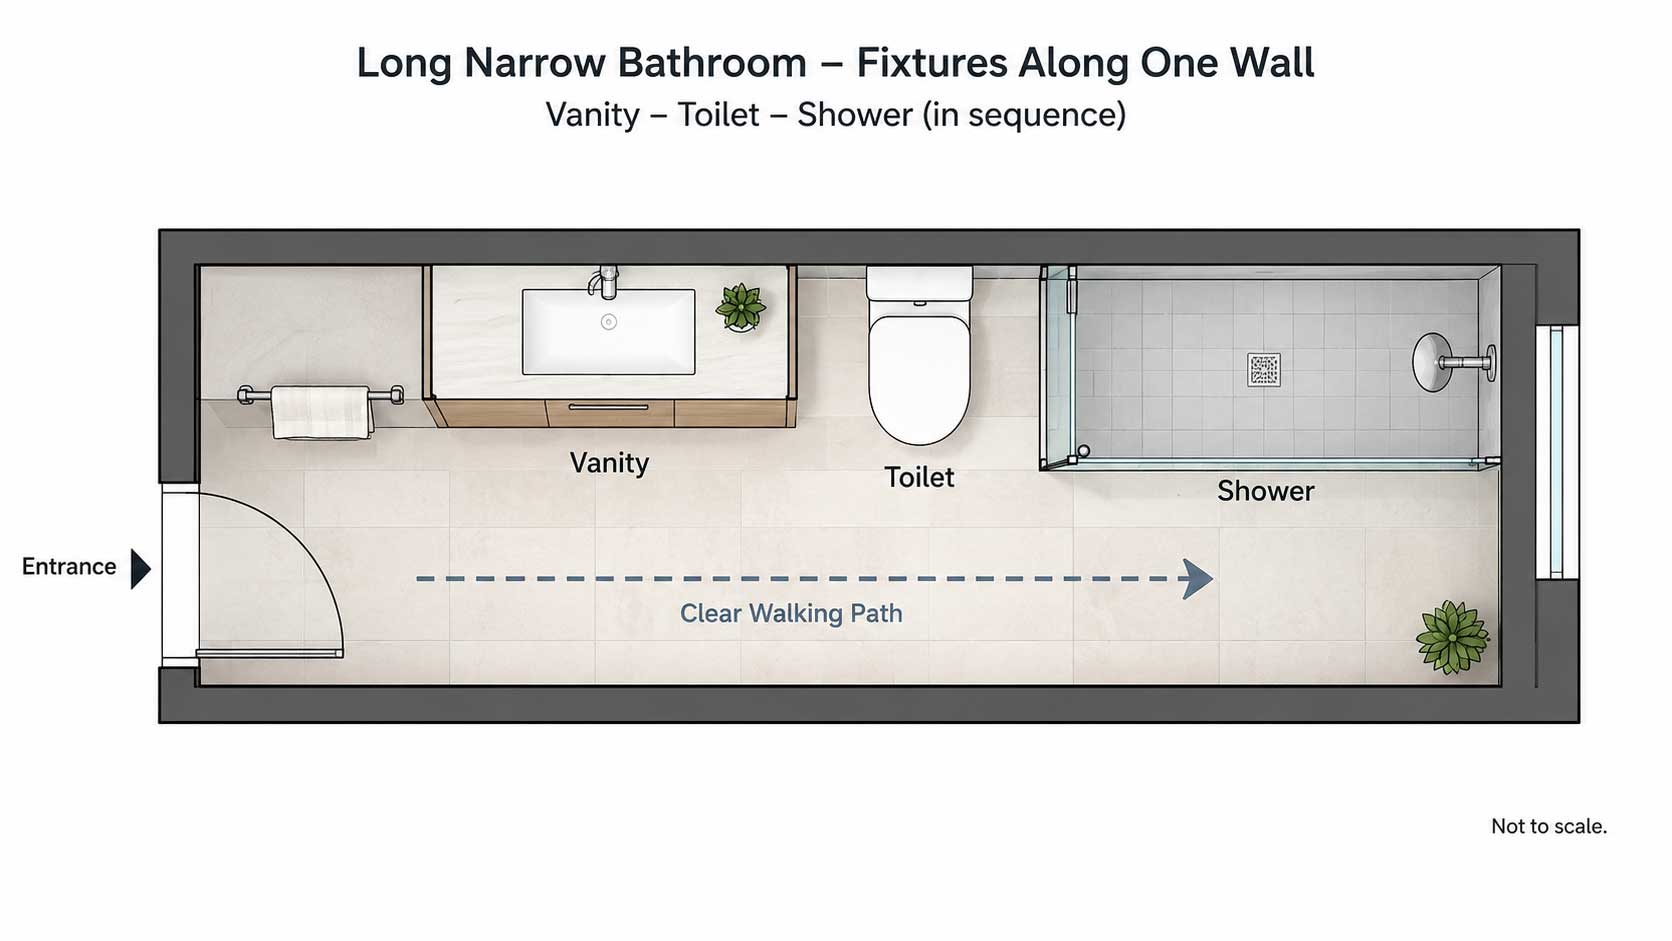
In this arrangement, the vanity, toilet, and shower occupy successive sections of one long wall, leaving a route along the opposite side. It is worth exploring when the entrance sits near a short end of the room and opens beside that route.
Think about fixture order before filling the wall. A vanity near the entrance gives you somewhere to wash your hands without walking through the entire bathroom. The toilet might sit farther along, followed by the shower, although existing plumbing and privacy preferences may suggest a different sequence.
The main challenge is allocating enough length to each activity. A toilet needs usable space beside it, so the gap between the vanity and shower cannot simply be whatever remains after those items are chosen. Treat each fixture and its surrounding space as one part of the plan.
Vanity depth offers another useful adjustment. If a deep cabinet interrupts an otherwise comfortable route, compare a shallower model with a basin that still suits your routine. You may lose storage, but gain room where you pass several times a day.
The trade-off: concentrating fixtures on one wall leaves fewer opportunities for cabinetry along it. Keep the opposite wall relatively clear rather than adding a second row of deep units that undermines the arrangement.
2. Position the Shower Across the Far End
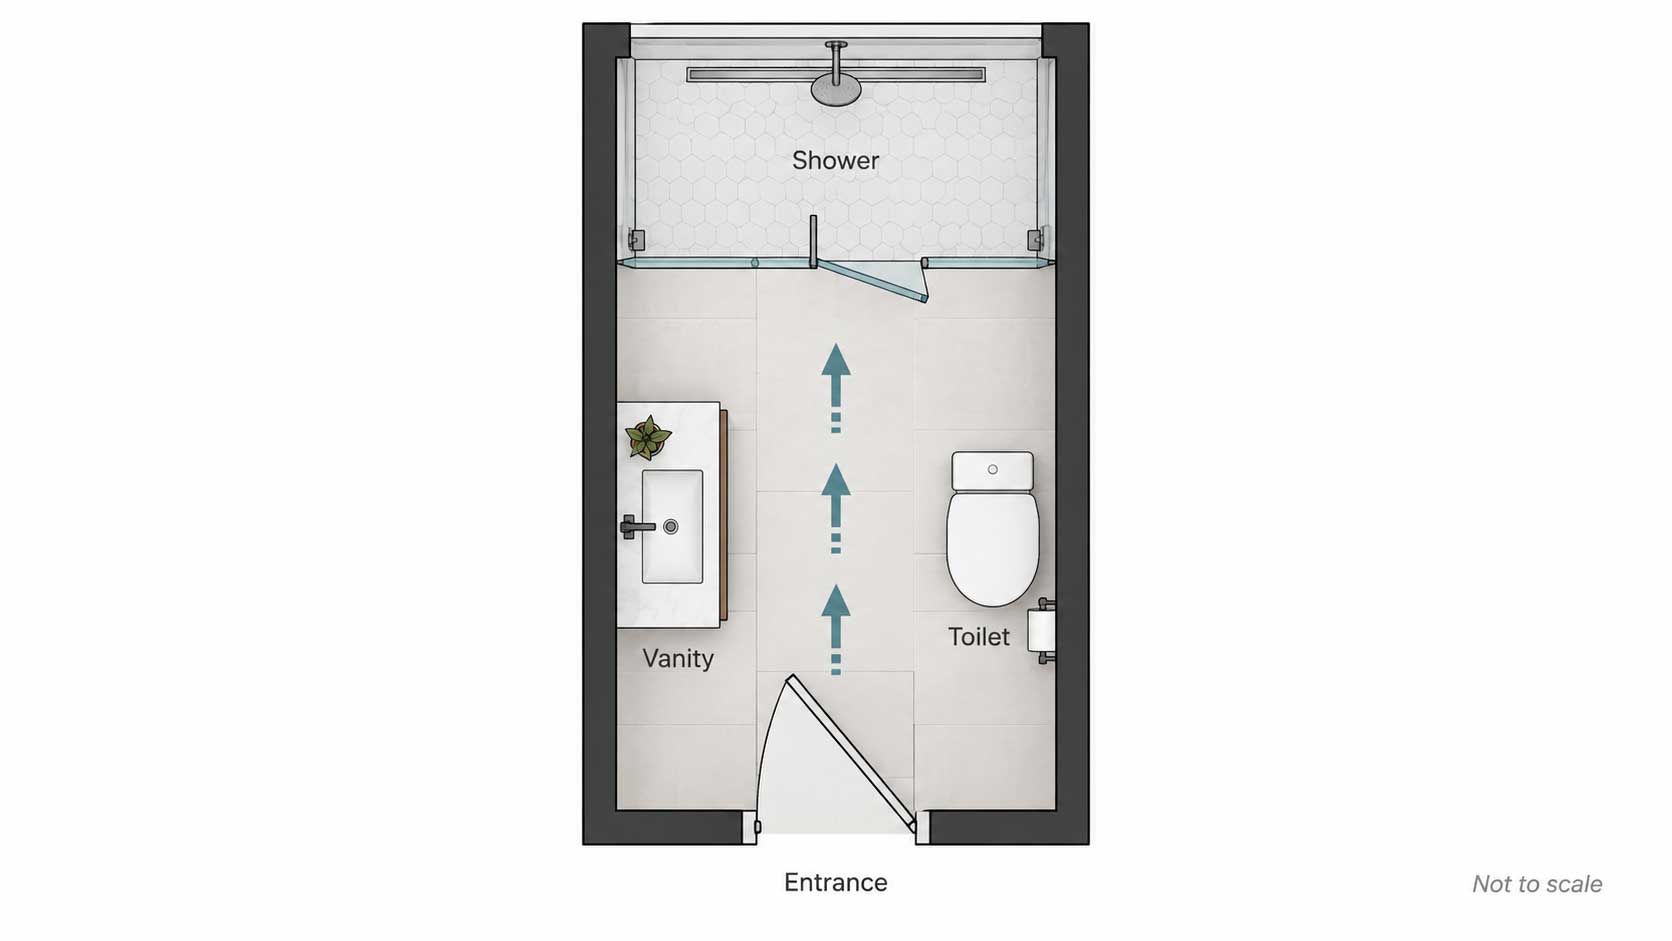
An end-wall shower uses the back of the bathroom as a dedicated bathing zone. Unlike the single-wall arrangement, it spans the room’s width, leaving the side walls nearer the entrance available for the vanity and toilet.
This option deserves a closer look when the room is too narrow for a shower beside a comfortable passage. By putting the shower beyond that passage, you avoid having to fit both across the same section of floor.
Plan the shower entrance around the space immediately outside it. A hinged screen needs room to open, while a sliding enclosure needs a compatible opening and panel arrangement. Also consider where you will stand to dry off and reach a towel without leaning across the toilet or vanity.
An end-wall window adds another decision. Its height, materials, and surrounding construction need assessment before it becomes part of the shower area.
You might also consider a fixed panel with an open entrance. However, leaving out the door changes how water is contained. Our guide to doorless shower ideas for small bathrooms explores that option in more detail.
The trade-off: using the full end wall for the shower limits what else can occupy that position. Check that the remaining length accommodates your other fixtures before committing.
3. Fit a Bathtub Across the Far End
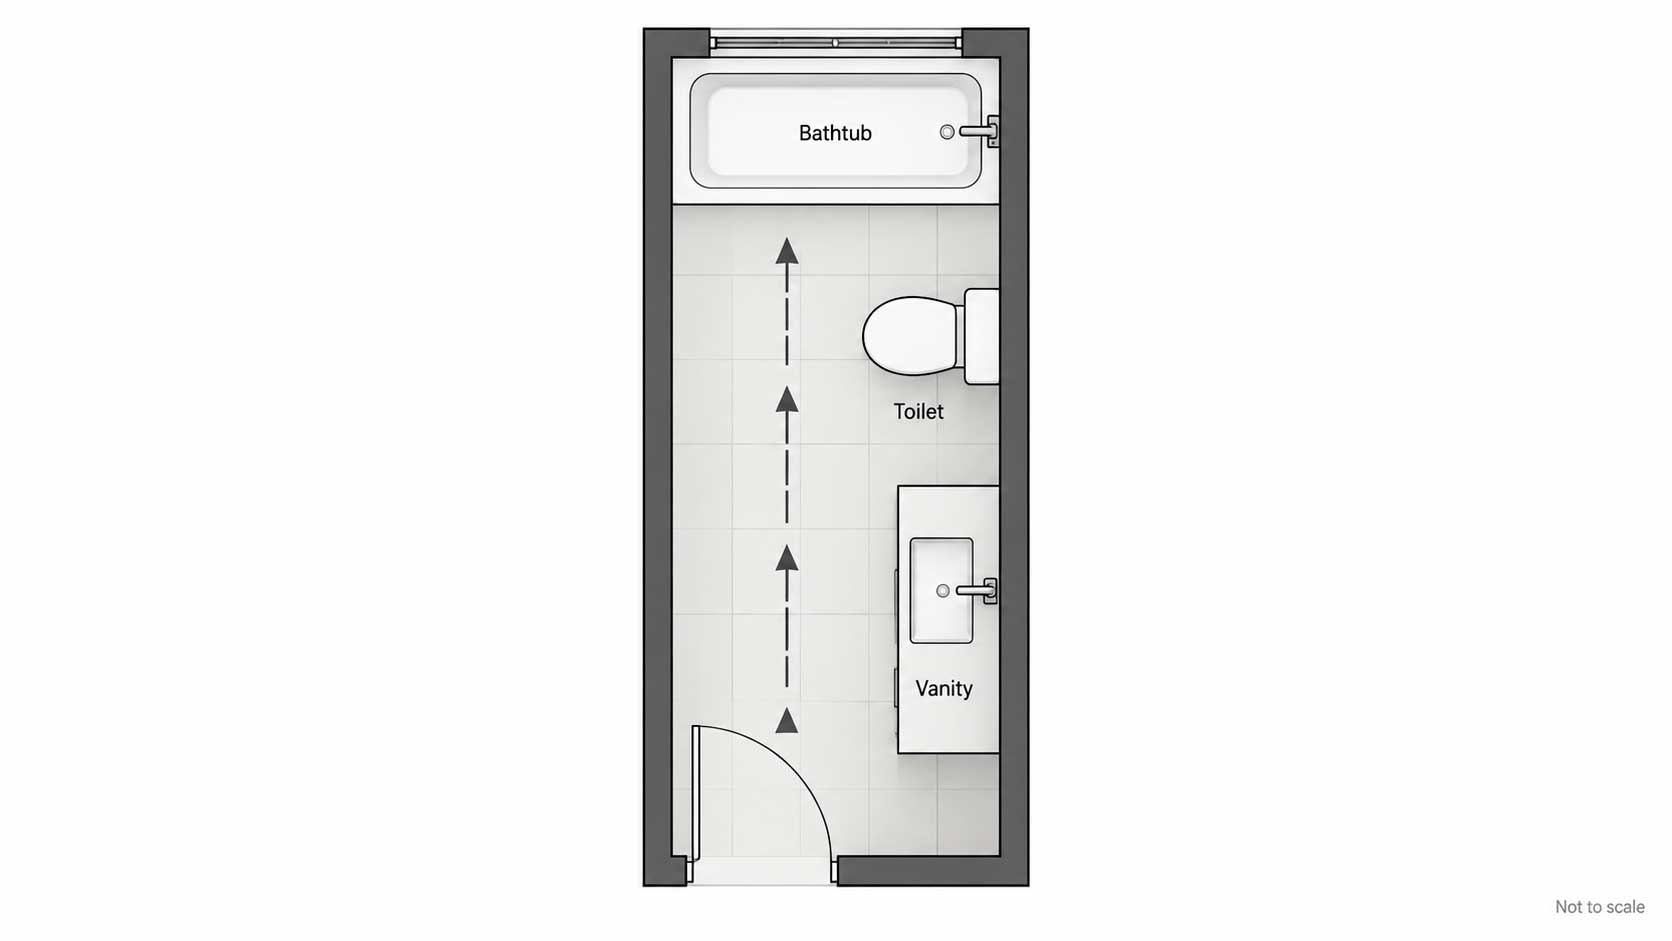
If baths are part of your household’s routine, placing the tub across the far end can keep it from occupying a long stretch of side wall. The remaining length is then available for the vanity and toilet, with access to the tub along its exposed side.
Room width is the deciding factor here. Check the selected model’s installation dimensions, including its surround and planned wall finishes. A tub that appears to fit between unfinished walls may leave insufficient space once construction is complete.
The type of bathtub also matters. An alcove model is designed for an enclosed installation, while a freestanding tub needs a layout that accounts for access and cleaning around its exterior. They are not interchangeable simply because their advertised lengths match.
For a bathroom that must support both bathing and everyday showers, a suitable tub-shower combination is another option to explore. Consider entry, screen placement, and whether stepping over the tub side suits everyone who will use it.
The trade-off: preserving a bathtub may mean accepting a smaller vanity or storing spare towels elsewhere. If the end-wall position does not fit, sketch the tub along a long wall and compare what that removes from the rest of the plan before choosing a smaller model.
4. Stagger Fixtures on Opposite Walls
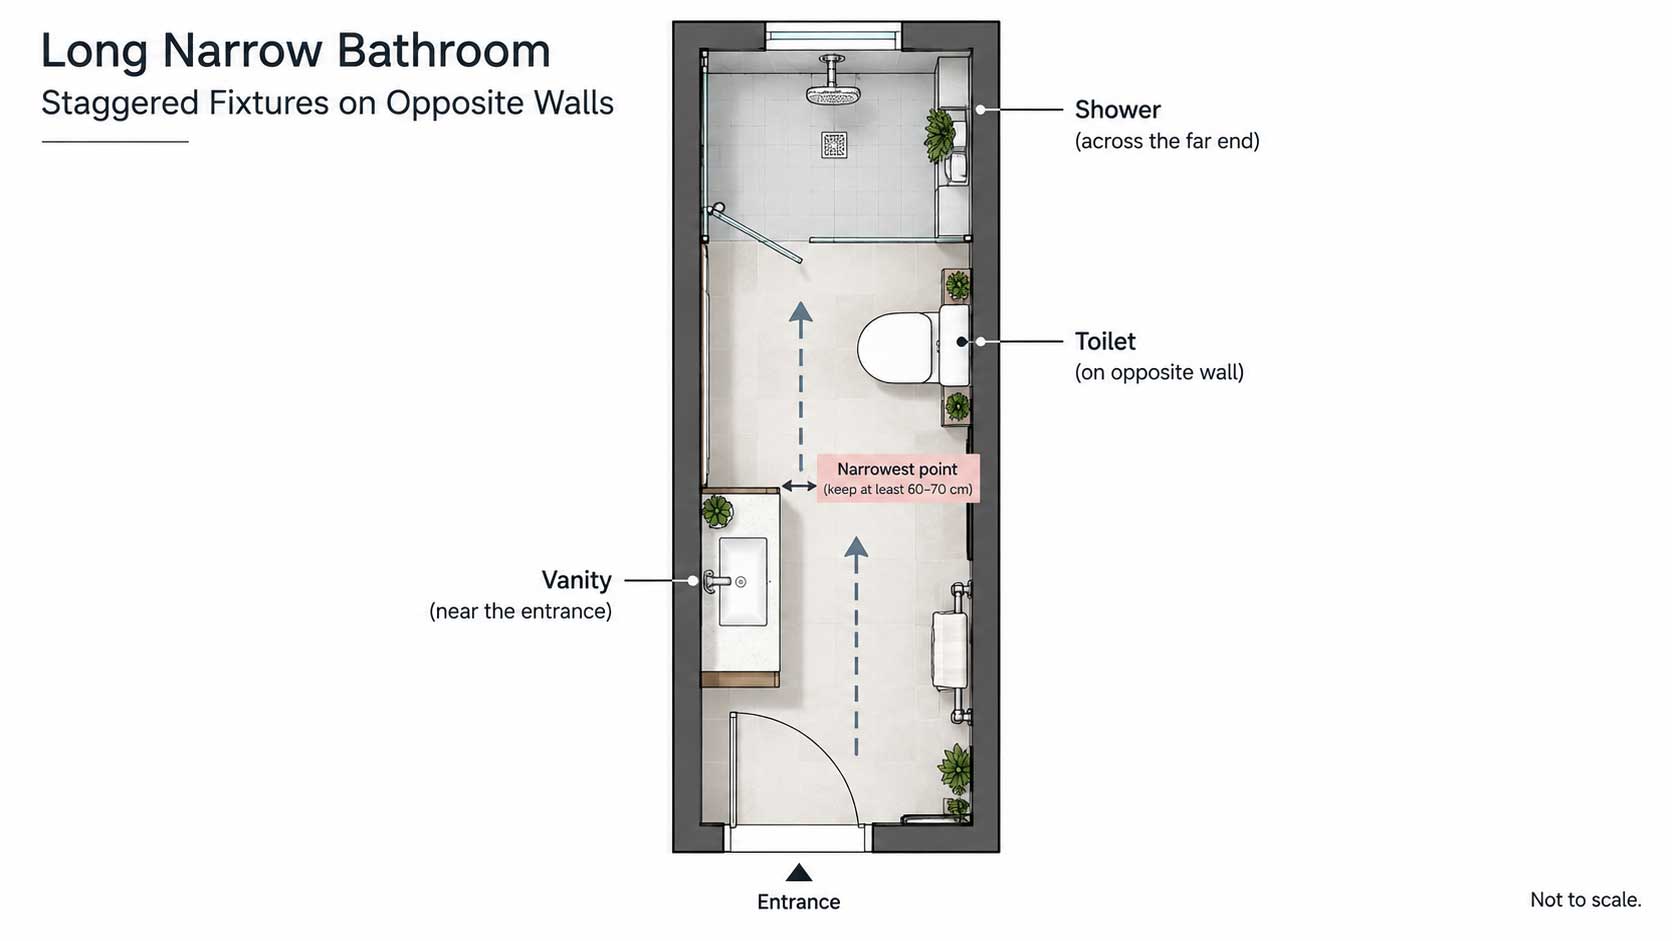
When one wall cannot comfortably accommodate everything, an offset arrangement gives you another option. A vanity can sit near the entrance on one side, with the toilet farther along the opposite wall and the bathing area beyond.
The important detail is the offset. Placing a deep vanity directly opposite the toilet concentrates two projections in the same section of the room. Separating them along its length may leave more usable space in front of each, provided the room is wide enough.
On your sketch, trace the route between the fixtures. A slight change in direction may be workable; repeatedly weaving around corners suggests the arrangement needs revising. Pay particular attention to the transition between the end of the vanity and the toilet area.
This layout also deserves a check for shared use. Picture one person standing at the basin while another needs to pass. Does the staggered placement help, or does the person at the sink still block the only route?
The trade-off: using both walls creates more placement options, but can leave fewer uninterrupted areas for towel rails or other fittings. Add these to the drawing before finalizing the plan, especially where a projecting rail would narrow the passage. Keep the offset purposeful rather than spreading fixtures around simply to fill available wall space.
5. Create Two Zones Around a Side Entrance
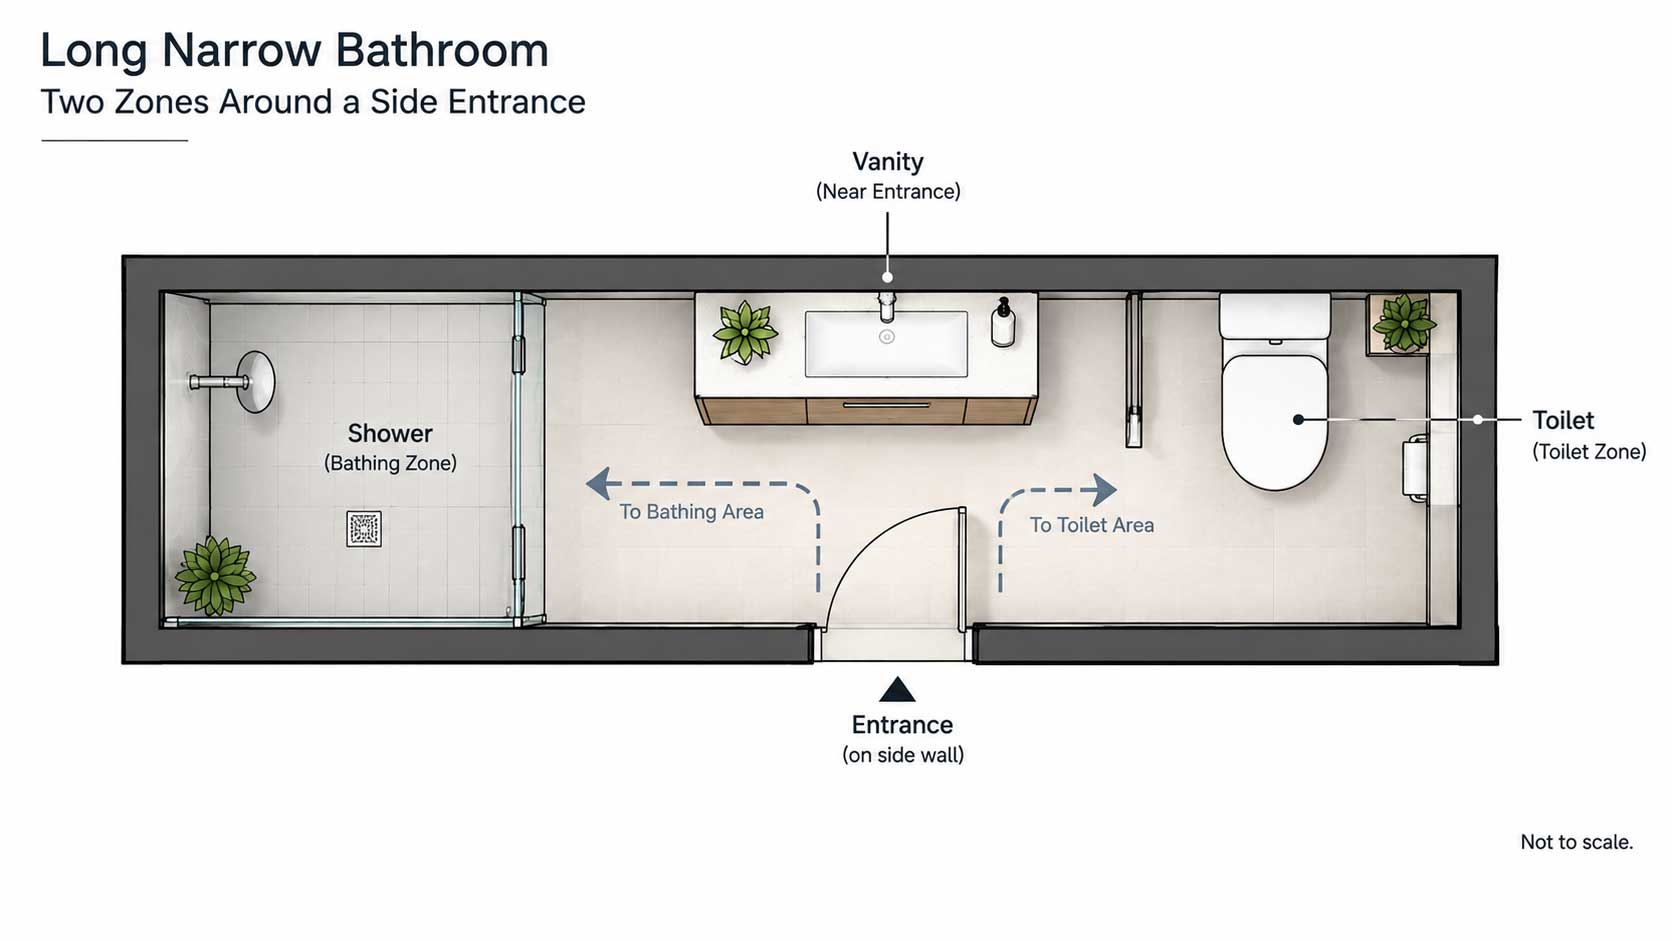
A doorway along a long wall creates a different starting point: you enter between the room’s ends rather than looking straight down its length. This gives you the option to place the bathing area in one direction and the toilet in the other.
Consider what you want within immediate reach of the entrance. A vanity opposite or slightly beside the doorway may be convenient for handwashing, provided there is enough space to enter and stand at the basin. The shower or bathtub can then occupy whichever end best suits its dimensions and existing services.
Privacy can influence the arrangement, too. If the open doorway faces a hallway or bedroom, check the sightline toward the toilet. Moving it farther into one end may reduce direct visibility without adding a partition that consumes space.
The entrance itself becomes the junction between both zones. Draw the door fully open and check whether it cuts off either route. A different swing or door type may help, but each option needs suitable surrounding space and construction.
The trade-off: dividing the room does not guarantee balanced proportions. One end may need more length for bathing, leaving the other cramped. Allocate space according to how each fixture is used rather than trying to create two equal halves.
Add Storage Without Narrowing the Walkway
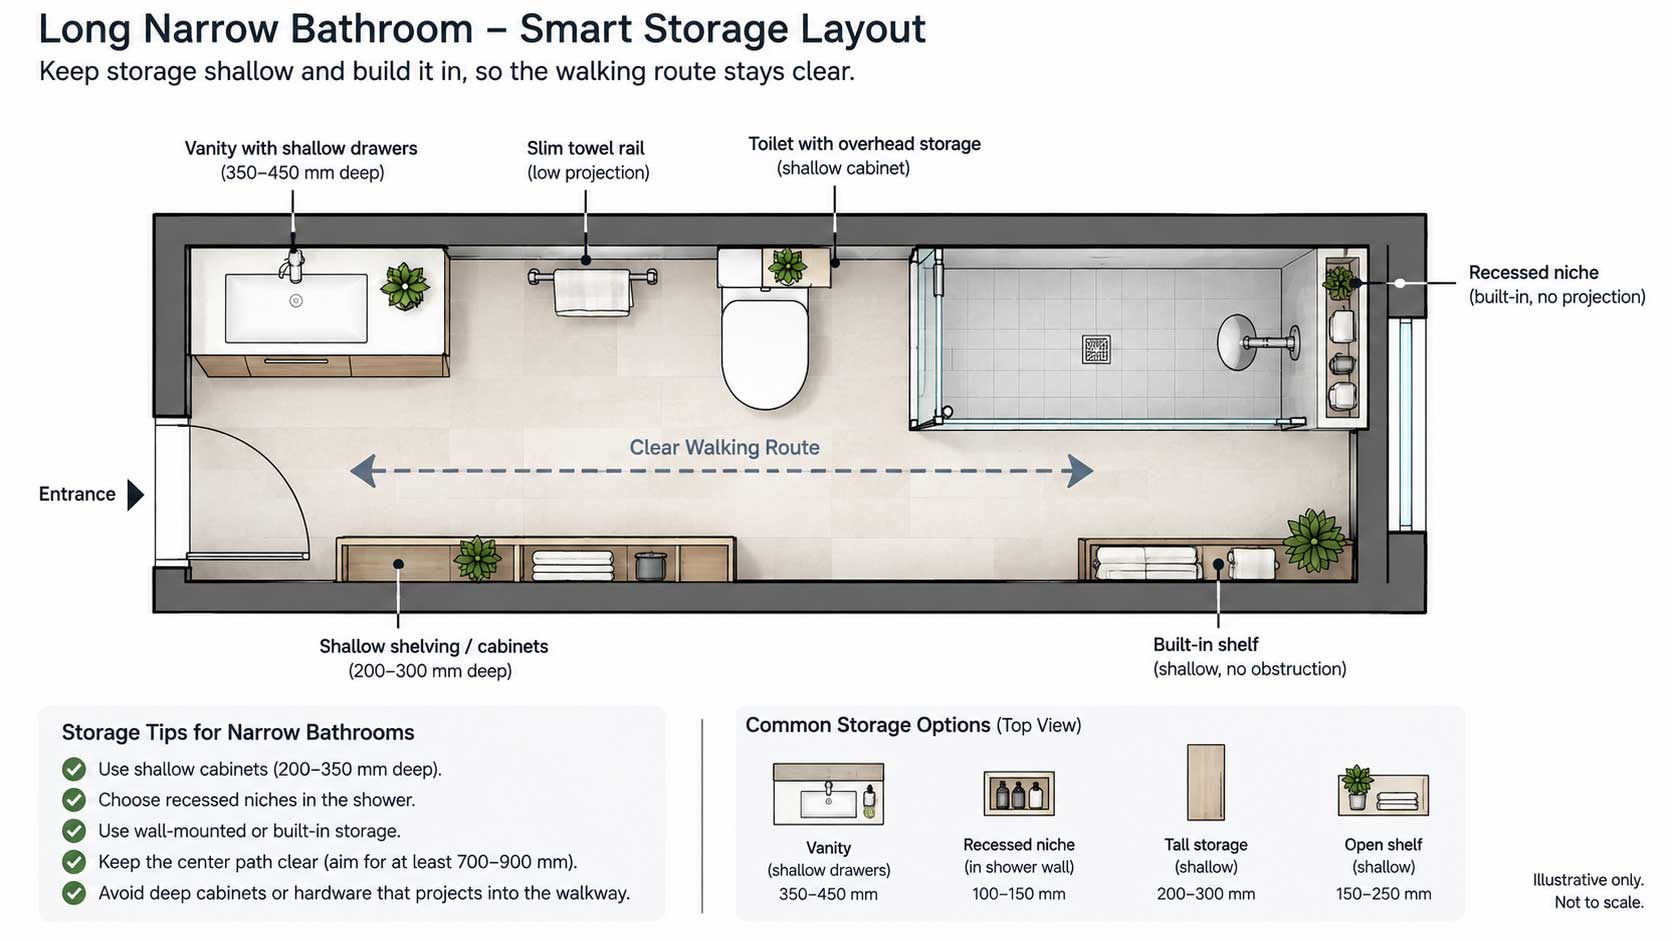
Once the main fixtures and walking route work together, look for storage that fits around them rather than reshaping the layout to accommodate more cabinetry. Start with the items you use every day, such as toiletries, hand towels, and cleaning supplies, and decide which ones genuinely need to stay in the bathroom.
In a narrow room, projection matters. A shallow cabinet may interfere less with movement than a deeper unit, but remember to include handles, open doors, baskets, and towel rails when judging how far storage extends into the room.
Recessed niches or cabinets can reduce visible projection where the wall construction allows them, although pipes, wiring, framing, and waterproofing may limit where they can be installed.
Resist the urge to fill every unused gap. Clear circulation space is doing useful work, especially around the vanity, toilet, and entrance. Storage should support the layout rather than gradually narrowing the route you worked to preserve.
Common Layout Mistakes to Avoid
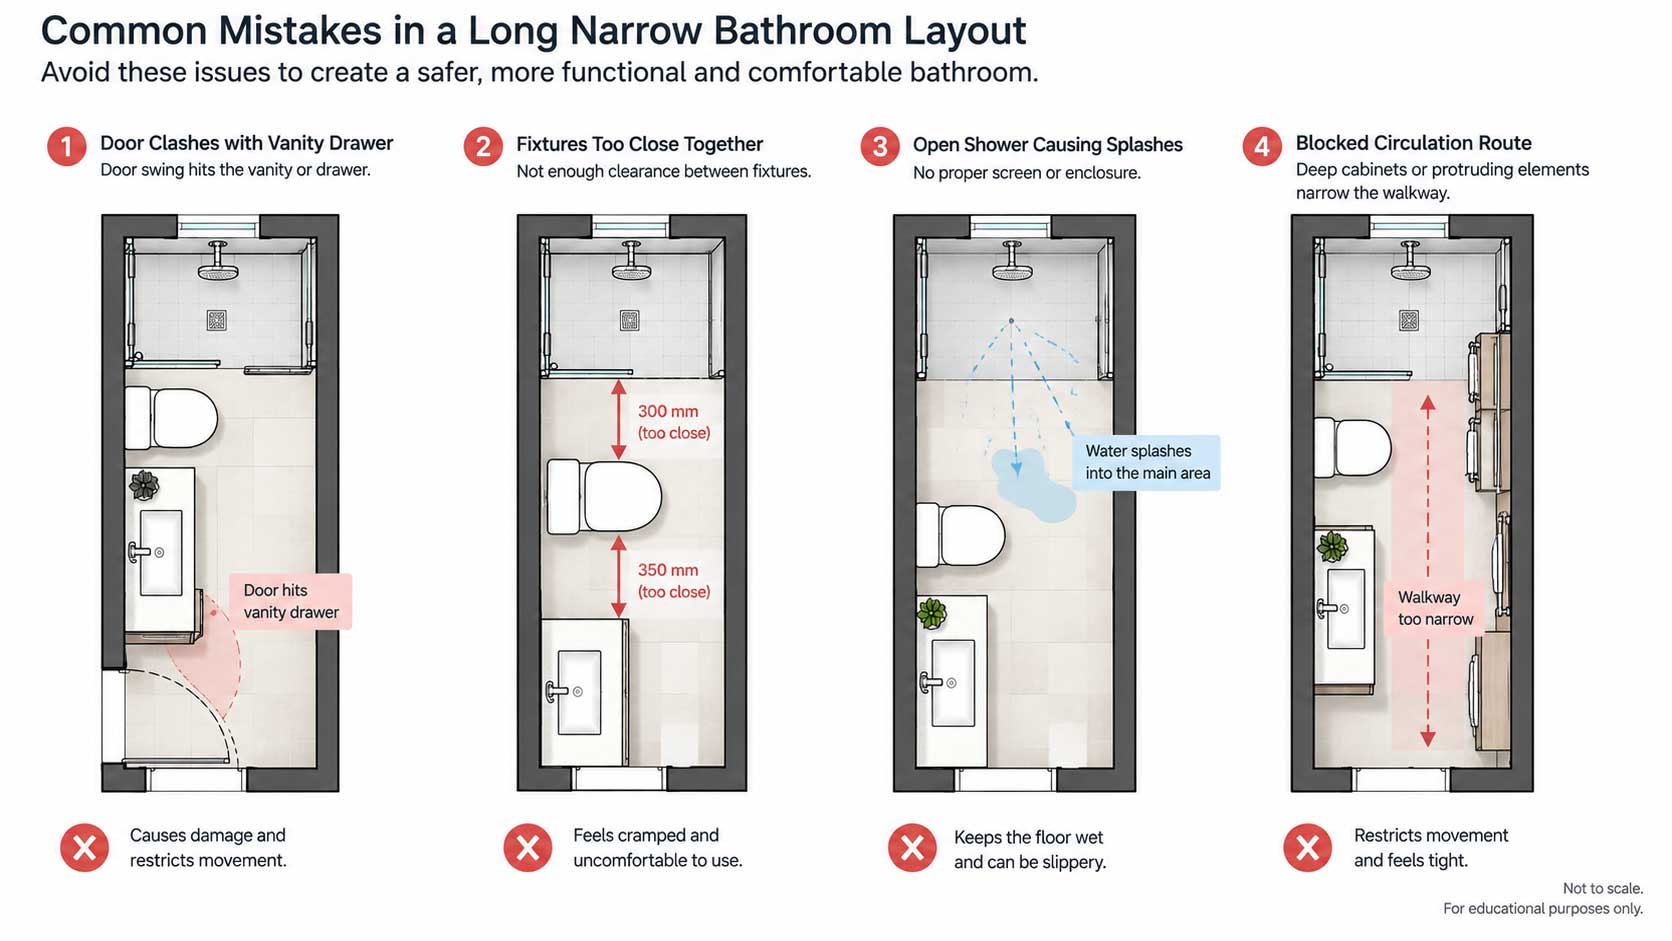
A layout can look convincing on paper and still become awkward once the fixtures are installed. Before finalizing your plan, check for these common problems.
Choosing fixtures before checking their full dimensions. A vanity, toilet, or shower enclosure may fit by width but project farther into the room than expected. Include doors, drawers, screens, and other moving parts in the footprint.
Ignoring door swings and open drawers. An entrance door that clears a closed vanity may still collide with a drawer or block the route when both are in use.
Assuming wall-mounted fixtures automatically create more clearance. Seeing more floor can make the room feel less crowded, but the fixture still occupies physical space.
Planning an open shower without controlling water. A fixed panel or doorless entrance needs appropriate drainage, waterproofing, and splash containment.
Forgetting cleaning and maintenance access. Tight gaps around tubs, toilets, and cabinetry can make routine cleaning or future repairs unnecessarily difficult.
Where practical, mark fixture footprints on the floor with painter’s tape and walk through your normal routine. Open imaginary doors and drawers, stand at the basin, and step in and out of the shower. This can reveal conflicts early, but it does not replace a properly reviewed installation plan.
Frequently Asked Questions
Can a Long Narrow Bathroom Fit Both a Tub and a Separate Shower?
It can, but the room needs enough usable length and width to accommodate both without compromising access to the vanity, toilet, or bathing areas. Rather than assuming both will fit, sketch the actual fixture dimensions and the space needed around them. In tighter rooms, a tub-shower combination may be a more practical alternative.
Should the Toilet or Vanity Be Closer to the Door?
There is no universal order. A vanity near the entrance can make handwashing convenient, while placing the toilet farther from the doorway may improve privacy. Door movement, plumbing locations, and the available standing space around each fixture should guide the decision.
Can You Improve the Layout Without Moving Plumbing?
Sometimes. Changing fixture sizes, reducing vanity depth, adjusting storage, or reconsidering the door arrangement can improve movement while keeping major plumbing connections in place. However, existing pipe positions may still limit how much the layout can change.
How Can You Make a Long Narrow Bathroom Feel Wider?
Keep visual interruptions to a minimum. Consistent finishes, good lighting, clear sightlines, and less bulky storage can make the room feel more open. These changes affect perception rather than physical clearance, so they work best after the fixture layout already functions well.
For more visual strategies, see our guide to making a small bathroom look bigger.
Choose the Layout That Works for Your Daily Routine
Once you have compared the five options, narrow your shortlist to the two layouts that best match your room’s dimensions, entrance position, and household needs.
Then test each one against everyday use. Consider how you enter the room, reach the basin, use the toilet, step into the shower or tub, access storage, and clean around the fixtures. A layout that looks efficient on a sketch may still create small inconveniences that become noticeable over time. Before committing, confirm the dimensions of the actual fixtures you plan to install and check any relevant installation requirements. The goal is not to fit the most features into the room, but to choose an arrangement that makes the space easier to use every day.

Royan Abdillah is a home improvement enthusiast and interior design consultant with over 9 years of experience in the industry. Passionate about blending aesthetics with functionality, Royan Abdillah specializes in unique DIY furniture and pet-friendly home solutions. Through this blog, Royan Abdillah aims to help homeowners create beautiful, personalized spaces on a budget.