Living in a home with a small kitchen island can feel like a constant balancing act. You need more workspace and better kitchen organization, but you don’t want to make your space feel cramped or bulky. I’ve been there—staring at my cramped kitchen island, wondering how it managed to look cluttered even though it was practically empty five minutes ago.
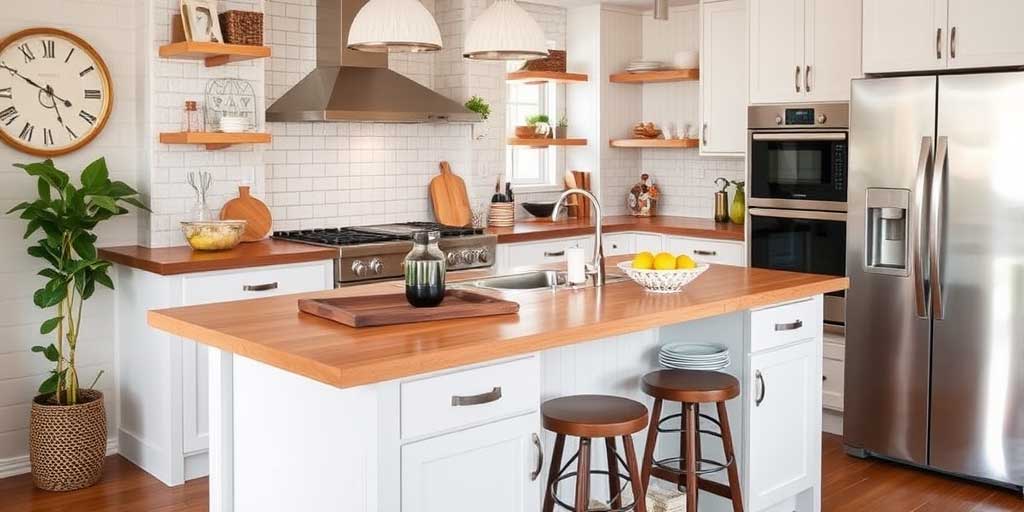
The secret isn’t just adding more storage; it’s about adding smart storage. In this guide, I’ll show you how to maximize every inch of your kitchen island while keeping your kitchen feeling airy and stylish.
In fact, the best solutions are often the ones you barely notice.
Think of it as “slim storage”—smart, space-saving kitchen ideas that add function without visually crowding your space. While I’ve shared many small kitchen island ideas before, today we’re focusing strictly on the storage side of things.
Common Mistakes That Make a Small Kitchen Island Look Bulky
Avoiding a cramped look is just as important as adding storage. If your kitchen feels smaller after an upgrade, you might be falling into these common traps:
- Countertop Overload (Too Many Items):
The fastest way to make an island look heavy is by crowding the surface. When you store your toaster, coffee maker, and a fruit bowl all on one small surface, the island loses its silhouette. The fix: Keep the top 80% clear and move those appliances to the side-mounted storage we discussed earlier. - High-Contrast Colors:
Using storage bins or shelves that contrast sharply with the island’s color (e.g., dark plastic bins on a white island) creates “visual breaks” that stop the eye. This makes the island appear chunky and disjointed. The fix: Use colors that blend with the island’s body to create a seamless, “slim” appearance. - Over-Storage (Filling Every Inch):
Just because there is an empty space doesn’t mean it needs to be filled. Over-storage happens when you utilize every single gap for bulky items, leaving no “breathing room.” The fix: Follow the 30% Empty Space rule to maintain a light, airy aesthetic that makes the entire kitchen feel larger.
Maximize Your Sides: The “Zero-Footprint” Strategy for Small Kitchen Island Storage
When space is limited, the sides of your kitchen island are your secret weapon. This is what I call “zero-footprint” storage because it doesn’t take up any extra room in your walkway.
Magnetic Knife & Spice Strips
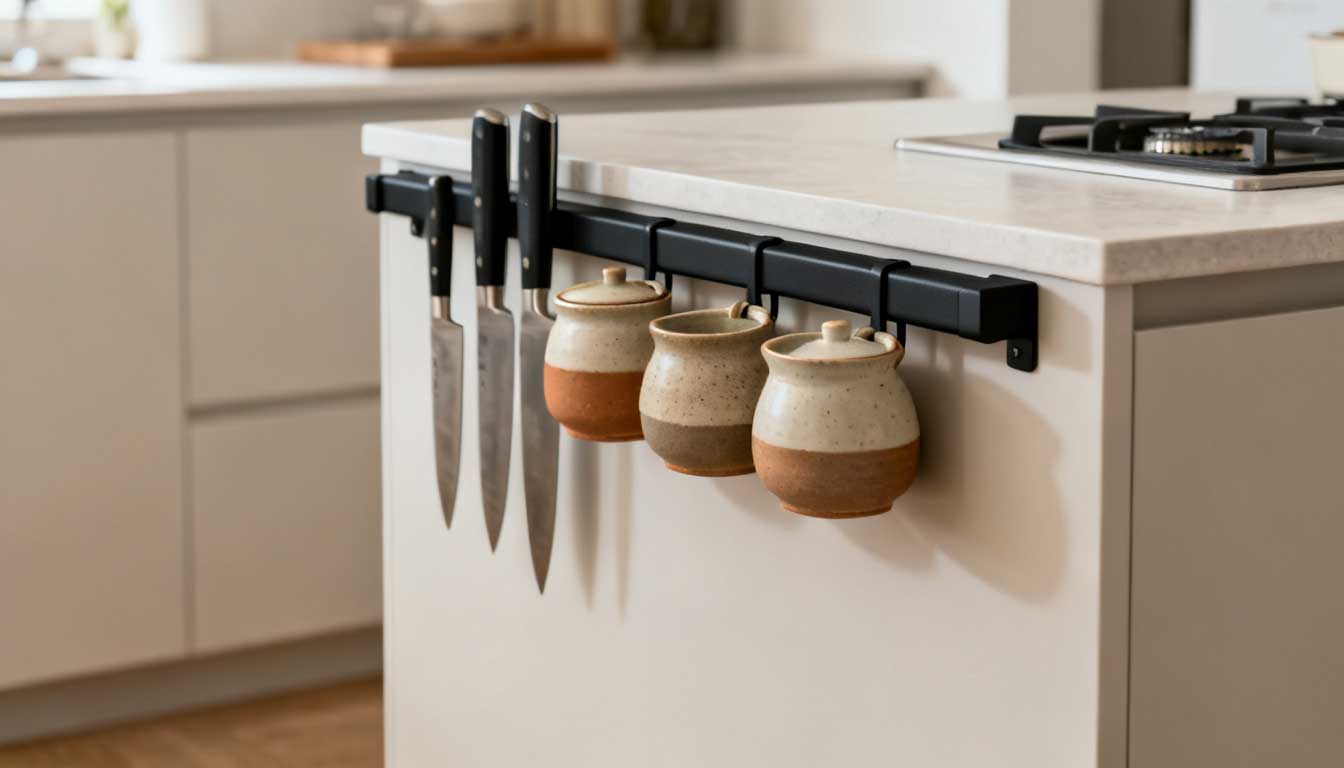
One of the most satisfying upgrades I’ve ever made was installing a heavy-duty magnetic strip on the side of my island. These are perfect for:
- Knives
- Metal spice containers
- Small kitchen tools
It frees up drawer space for bigger items and keeps your countertop clear for actual prep work.
Minimalist Rail Systems
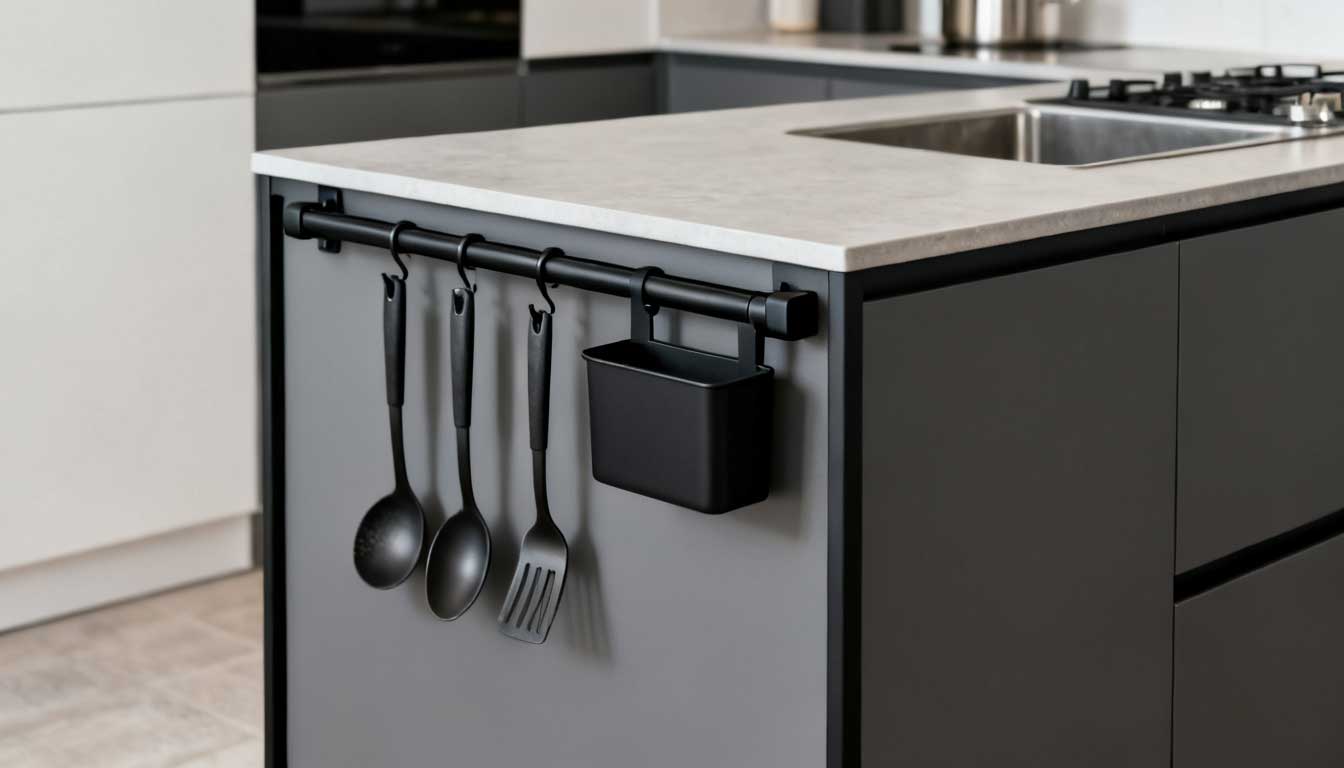
Think of rails (like the classic IKEA HULTARP series) as the Swiss Army knife of kitchen storage. You can use a slim rail with a few S-hooks to hang:
- Cooking utensils
- Dish towels
- Small baskets
They’re clean, functional, and don’t visually overwhelm your kitchen.
Expert Tip: Always mount these rails on the “short” side of your island. This ensures they don’t protrude into the main traffic lanes where you’re likely to bump into them.
Under-Counter Magic: Hidden Compartments
If you look closely at your island, there’s often “dead space” that’s just waiting to be used. Some of the best storage solutions are the ones you don’t see right away.
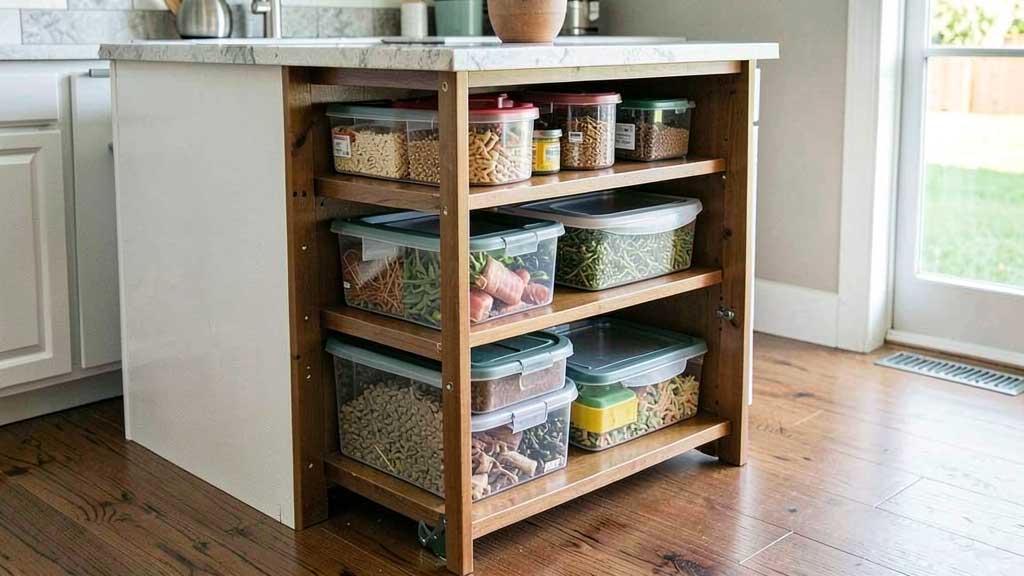
Pull-Out Slim Drawers
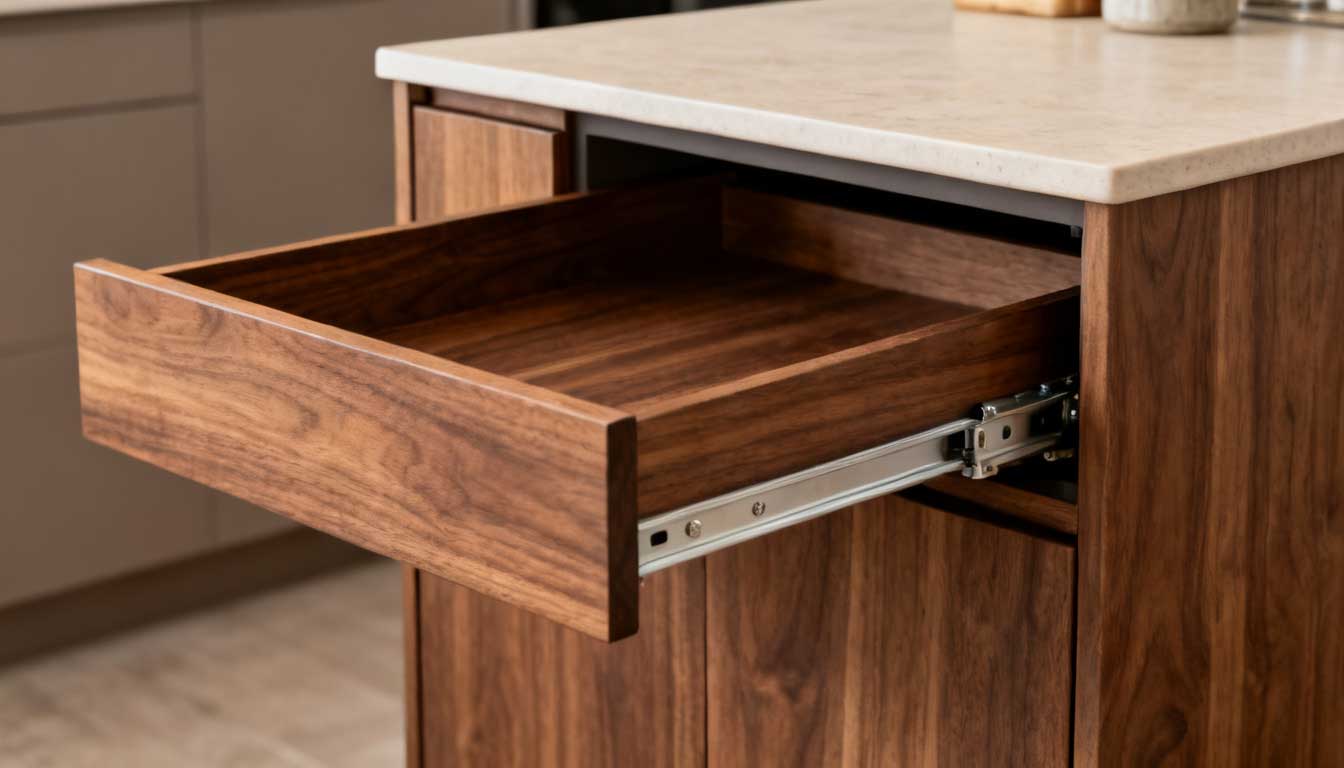
If you have a 3-4 inch gap right under your countertop, you have room for a pull-out drawer. These are perfect for storing flat items like cutting boards, baking sheets, or even a hidden spice rack. Slim pull-out drawers here can dramatically improve your storage without adding bulk. It’s a custom-feel upgrade that keeps the bulky stuff out of sight.
Hanging Wire Baskets
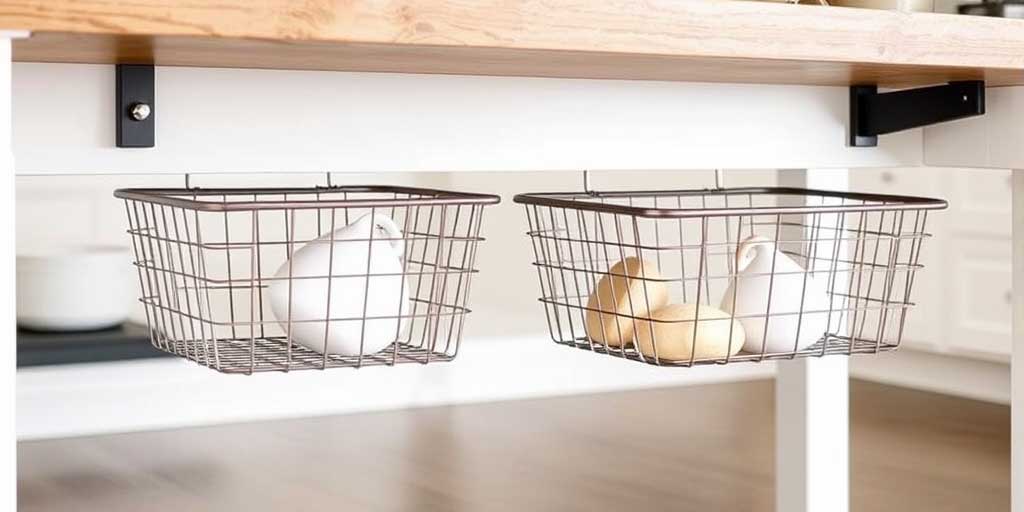
If your island has open shelving, don’t ignore the space underneath it. Hanging wire baskets are a game-changer.
Install hanging wire baskets to store:
- Napkins
- Recipe books
- Fruits or vegetables
This makes use of “dead air” space and keeps everything organized but accessible. It’s an easy, non-permanent way to double your storage capacity instantly.
Visual Balance: Keeping It Airy
Adding storage is one thing—keeping your kitchen looking clean and spacious is another. This concept also applies to bedrooms—especially if you’re working with limited space. Bedroom Design Ideas with Small Space. A common mistake is filling every open shelf with colorful boxes and mismatched gadgets. To keep a small kitchen feeling large, you need to manage the visual weight.
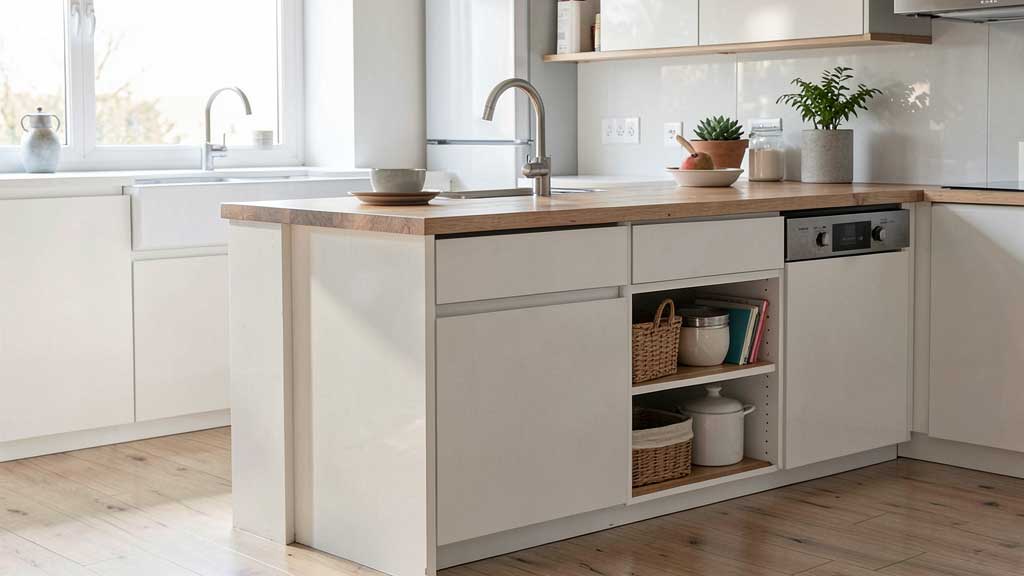
Open vs. Closed Storage
Use open shelves for items you use daily (and that look good!), like white plates or wooden bowls. Use baskets or drawers for the “ugly” stuff like plastic tupperware. Open shelving can make your kitchen feel bigger, but it can also look messy if not styled properly.
Material Matching
A small detail that makes a big difference: match your storage accessories to your island’s hardware. For example, if your faucet is matte black, go with matte black hooks and rails. For example:
- Matte black rails → matte black handles
- Brushed brass hooks → brass fixtures
This creates a cohesive, high-end look—even in a small space. This makes the storage look like part of the furniture, not an afterthought.
If optimizing your current fixture still leaves you short on floor space, you might want to look into fully mobile alternatives. Be sure to explore our ultimate roundup of the best small kitchen island on wheels with storage options to find a flexible, rolling solution that can be tucked away whenever you need extra room.
The “Bulk-Free” Island Upgrade Checklist
Before adding anything to your kitchen island, use this checklist to ensure your island stays functional:
- The 2-Inch Rule: Side attachments shouldn’t protrude more than 2 inches into your path.
- Weight Distribution: Place your heaviest items (cast-iron pans/blenders) on the bottom shelf to maintain stability.
- 30% Breathing Room: Leave at least 30% of your shelf space empty. It prevents that “overcrowded” look.
- Cohesive Containers: Swap mismatched packaging for uniform glass jars or wicker baskets.
- Locking Caster Check: If you have a rolling island, make sure the brake is still easy to reach after adding your upgrades.
These small guidelines make a big difference in keeping your kitchen both functional and comfortable.
Frequently Asked Questions (FAQ)
Q: How deep should a small island be to allow for storage?
A: Ideally, aim for 18–24 inches. This depth is the “sweet spot”—it’s deep enough for functional drawers but shallow enough to keep your kitchen’s floor plan open.
Q: Can I add storage to a DIY rolling island?
A: Absolutely! However, I recommend focusing on lightweight storage on the sides. Avoid adding heavy drawers to a mobile island unless it has a very wide base, as it can become top-heavy.
Q: What is the best way to hide “ugly” kitchen clutter?
A: Woven baskets are my go-to. They add a natural texture to the kitchen while completely hiding the mismatched lids and plastic containers that usually ruin the aesthetic.
Conclusion
Adding storage to a small kitchen island is all about being intentional. A small kitchen doesn’t mean you have to sacrifice storage—it just means you need smarter solutions. By using vertical space, hidden compartments, and maintaining visual balance, you can transform a simple table into a powerhouse of organization.
Remember, a tidy kitchen isn’t just about aesthetics; it’s about making your daily cooking routine smoother and more enjoyable.
Ready to find the perfect foundation for these hacks? Check out our top picks in our main guide: 12 Clever Small Kitchen Island Ideas.
Royan Abdillah is a home improvement enthusiast and interior design consultant with over 9 years of experience in the industry. Passionate about blending aesthetics with functionality, Royan Abdillah specializes in unique DIY furniture and pet-friendly home solutions. Through this blog, Royan Abdillah aims to help homeowners create beautiful, personalized spaces on a budget.