Let’s be honest: buying a pre-made coffee bar cabinet from a furniture store can feel like a punch to the wallet. You scroll through beautiful interior design feeds, find the “perfect” rustic coffee hutch, click the link, and immediately close the tab when you see a $400 price tag. To make matters worse, even if you are willing to splurge, those standard store-bought cabinets are almost always too bulky, too wide, or too deep for a truly compact kitchen.

When you are dealing with limited square footage, you cannot afford to waste space on furniture that wasn’t built specifically for your room’s exact dimensions.
I remember staring at my cramped kitchen counters a few years ago. My espresso machine took up the prime meal-prep area, the coffee beans were shoved behind the cereal boxes, and my favorite mugs were stacked precariously in a high cabinet I could barely reach. I wanted that cozy, boutique cafe experience at home, but I didn’t have thousands of dollars for a kitchen remodel, and I certainly didn’t have the space.
That is when I decided to take matters into my own hands. Building a DIY small kitchen coffee station isn’t just about saving money (though your bank account will definitely thank you); it’s about creating a personalized ritual. When you learn how to make a coffee station at home, you get to decide exactly where the mugs hang, how high the shelves sit, and how to make every single millimeter of your space work for you.
You don’t need to be a professional carpenter or own an expensive garage full of power tools to make this happen. Whether you are looking for cheap DIY coffee bar ideas or a renter-friendly DIY coffee bar that won’t break your lease, this guide will show you how to build your dream coffee nook from scratch.
If you’re still deciding where to place your setup, these coffee station in a small kitchen corner ideas can help you turn an unused nook into a practical and stylish coffee zone.
Quick Project Overview
| Feature | Details |
| Estimated Cost | $30–$75 |
| Time Required | 1–3 hours |
| Skill Level | Beginner |
| Best For | Small kitchens, apartments, renters |
| Special Tools | Basic drill, screwdriver, tape measure |
💰 Budget & Material Checklist (The Planning Phase)
Before we pick up a screwdriver, let’s talk numbers and materials. The beauty of a homemade coffee bar for small spaces is that you can scale the project based on what you already own and what you are willing to spend.
A basic, beautiful DIY setup typically costs between $30 to $75, depending on whether you use recycled materials or buy new timber. Here is your essential shopping and scavenging checklist to prepare for the build:
Estimated Budget Breakdown
- The Foundation (Table/Cart/Shelf): $0 – $35 (Free if upcycling; low cost if using thrift stores or IKEA basics)
- Hardware & Fasteners: $5 – $10 (Screws, wall anchors, or heavy-duty mounting tape)
- Finishing Touches: $10 – $15 (Sandpaper, a small can of wood stain, or leftover paint)
- Vertical Organization: $8 – $15 (Hooks for mugs, small metal rails, or baskets)
- Total Estimated Investment: $23 – $75
Core Materials Needed
- The Wooden Top/Plank: A sturdy piece of wood (pine, oak, or thick plywood) to serve as your DIY coffee station counter top. You can often find cheap off-cuts at local hardware stores.
- Support Brackets or Legs: Strong steel L-brackets if you are mounting directly to the wall, or heavy-duty caster wheels if you are modifying a rolling cart.
- Wall Anchors & Screws: Crucial for safety. If you are hanging a DIY coffee mug rack wall mounted, you must use heavy-duty drywall anchors (or toggle bolts) if you cannot find a wall stud.
- Wood Stain, Wax, or Paint: To seal the wood and protect your DIY station from inevitable coffee spills and water rings.
- Heavy-Duty Mounting Tape (Optional): If you are building a strictly renter-friendly setup and cannot drill into walls, look for structural, industrial-strength double-sided adhesive tape for lightweight accessories.
Tools Required
- A tape measure (the most important tool for small spaces!)
- A hand screwdriver or a basic power drill
- A spirit level (or a free leveling app on your phone) to ensure your mugs don’t slide off
- Sandpaper (120-grit and 220-grit for a smooth-to-the-touch finish)
🛠️ 4 Smart Ways to Build Your DIY Base (Core Blueprint)
Now that you have your tools and budget ready, it’s time to build the foundation. Depending on your kitchen layout, DIY experience, and whether you own or rent your home, choose one of these four step-by-step blueprints to build your DIY coffee station table base.
1. The IKEA Hack Strategy (IKEA Hack Coffee Station)
Estimated time:⏱️ 45–60 minutes
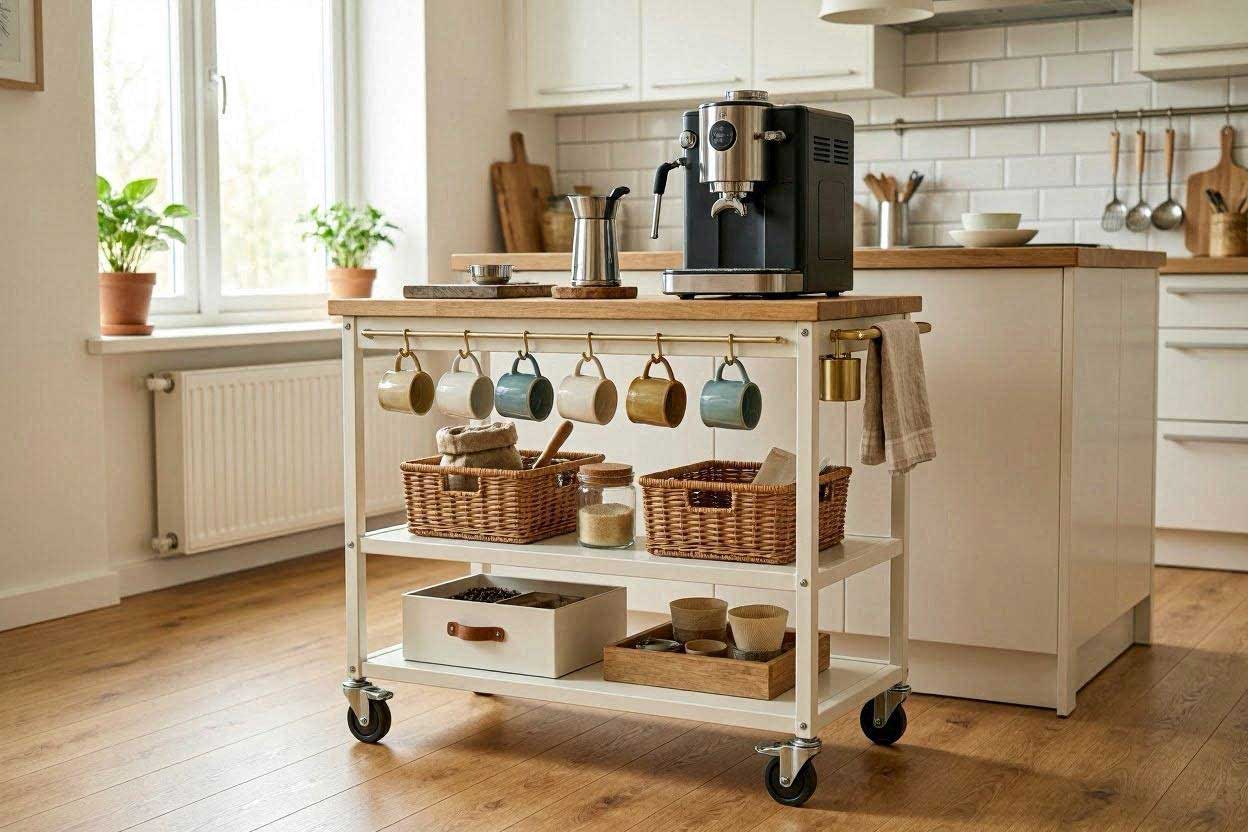
This method is perfect if you want a clean, modern look without building a piece of furniture entirely from scratch. We will transform a basic IKEA BEKVÄM spice rack or a small RÅSKOG utility cart into a high-end coffee bar.
- Step 1: Sand the Surface. Take the raw wooden elements of your IKEA furniture and lightly sand them with 220-grit sandpaper to remove any rough factory edges.
- Step 2: Customize with Stain or Paint. Coat the wooden pieces with a rich wood stain or paint them to match your kitchen cabinets. Painting the frame matte black and leaving the wood top natural creates a gorgeous modern industrial look.
- Step 3: Assemble and Add Hardware. Assemble the unit according to the instructions. Screw small metal utility hooks onto the sides of the cart or shelf to hang your milk frothing pitchers or towels.
- Step 4: Position Your Gear. Place your espresso machine on the top tier. Group your coffee pods and syrups on the lower shelves to keep the top clutter-free.
💡 Best for: apartment dwellers, beginners, scandinavian-style kitchens
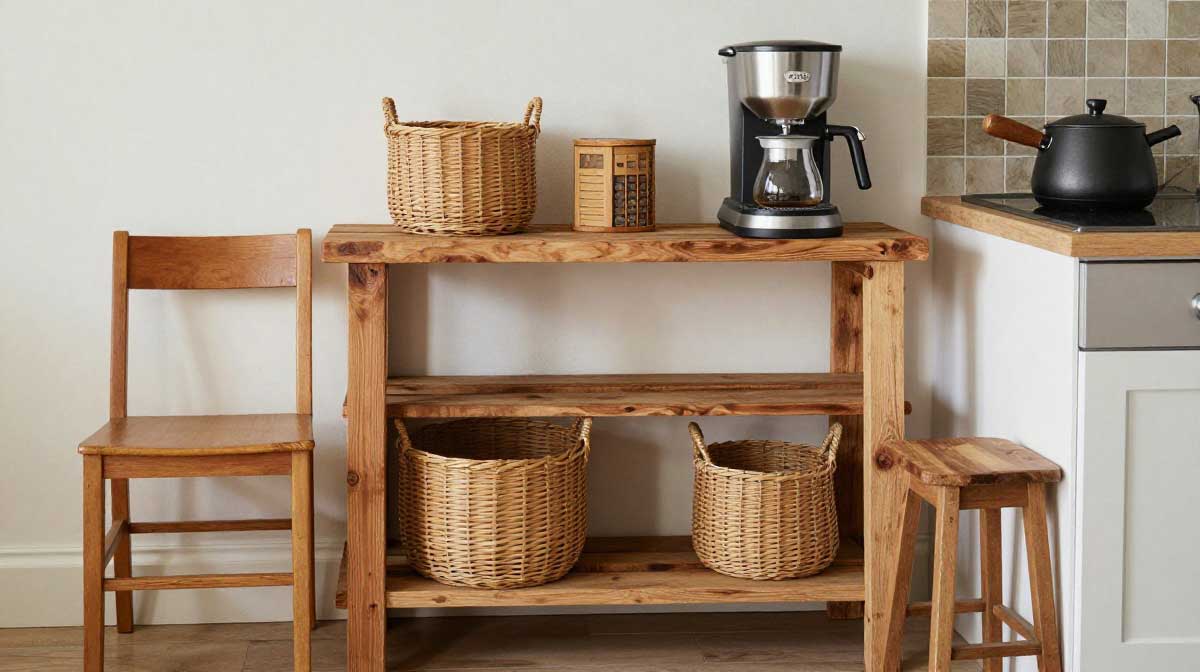
2. The Upcycled Thrift Find (Upcycled Furniture Coffee Station)
Estimated time: ⏱️ 2–3 hours (excluding drying time)
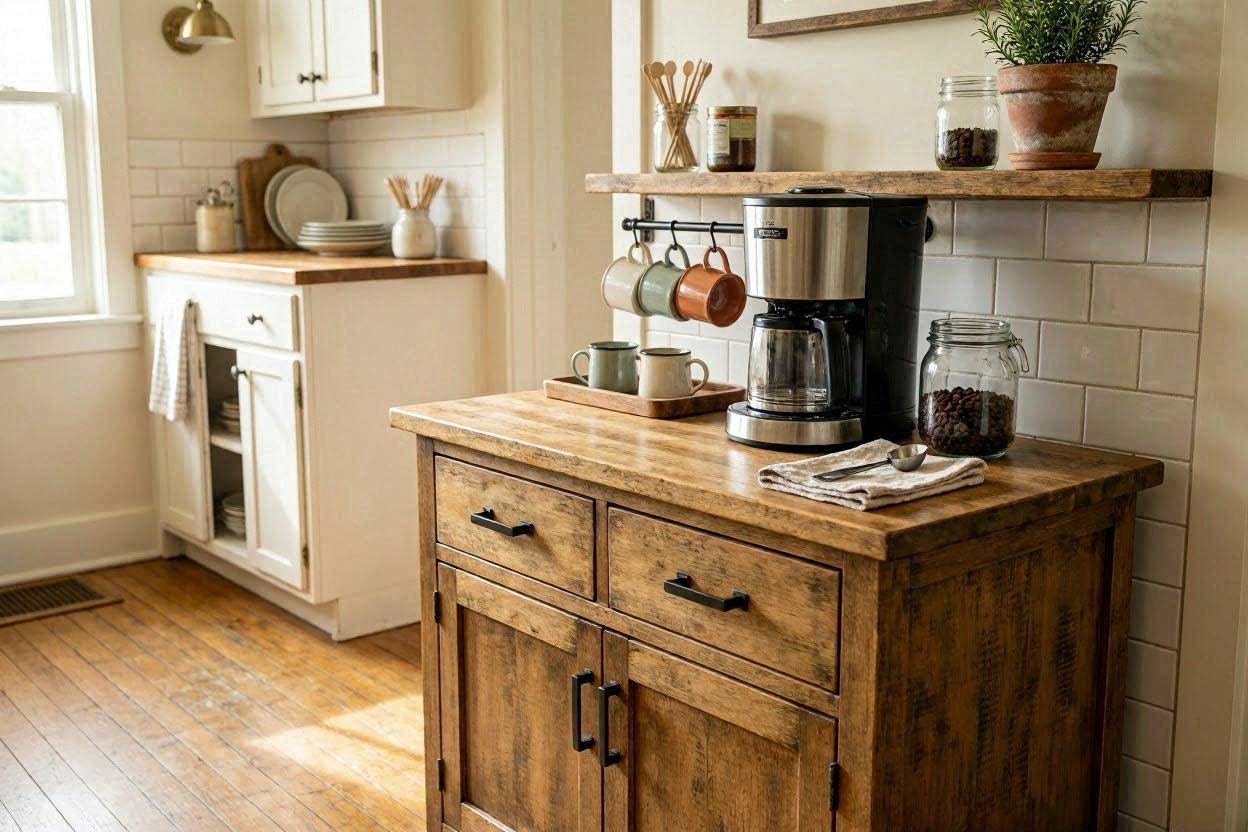
If you love a vintage, farmhouse vibe and want to save maximum cash, look for a cheap, sturdy piece of secondhand furniture like an old bedroom nightstand or a small entry table.
- Step 1: Clean and Prep. Wipe down the thrifted furniture with a damp cloth and mild soap. Remove all old drawers, knobs, and hardware.
- Step 2: Sand Away the Old Finish. Sand the entire piece down to bare wood if you plan to stain it, or lightly scuff the surface if you plan to repaint it.
- Step 3: Update the Hardware. Swap out old, dated drawer pulls for modern matte black or brushed brass handles. This simple change instantly elevates cheap DIY coffee bar ideas.
- Step 4: Seal for Spill Protection. Apply at least two coats of clear polyurethane or furniture wax to the top surface. This step is non-negotiable to protect your upcycled furniture coffee station from water damage and dark coffee stains.
💡 Best for: farmhouse decor lovers, budget-conscious diyers, vintage furniture enthusiasts
3. The Floating Countertop Wedge (DIY Coffee Station Counter Top)
Estimated time: ⏱️ 1–2 hours
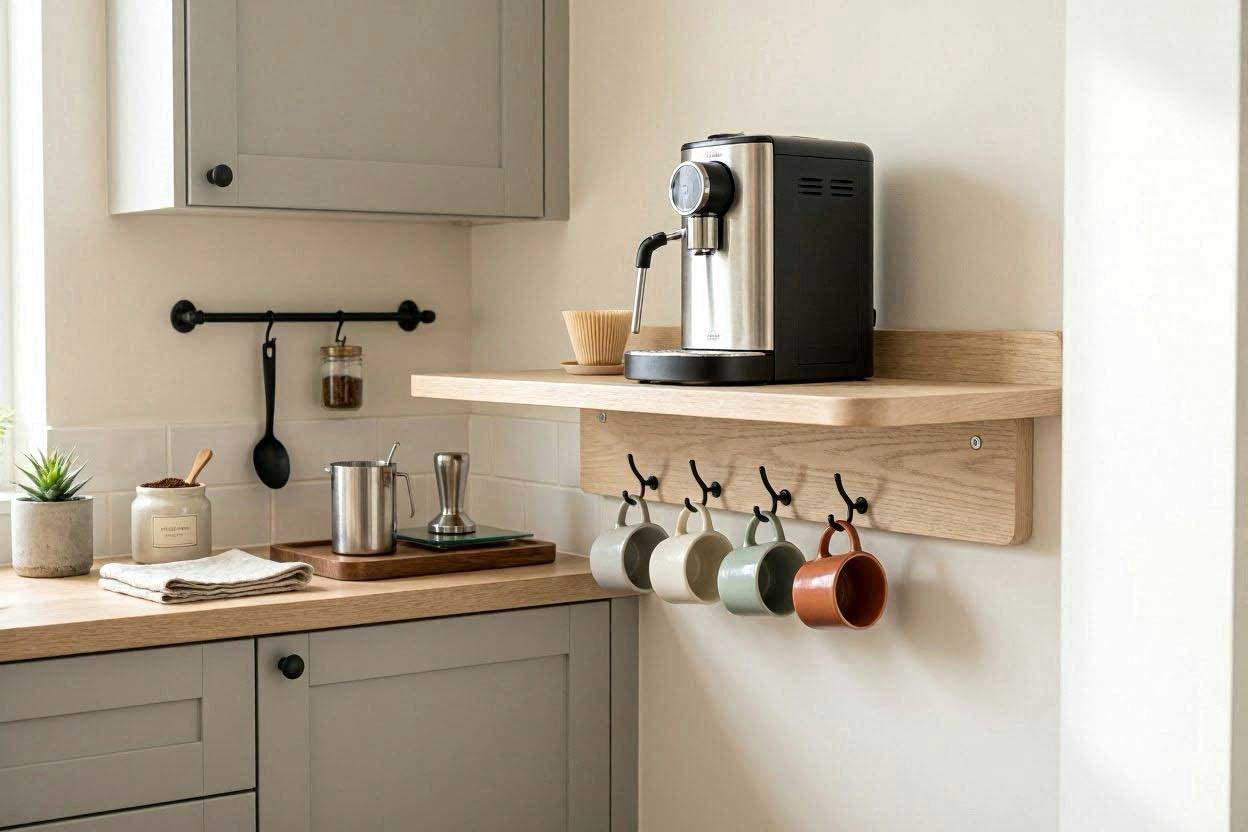
When you have absolutely zero floor space left in a tiny kitchen, hanging a floating wooden plank between two walls or inside a corner wedge is the ultimate space-saving layout.
- Step 1: Measure and Cut. Measure the exact width of your kitchen wall gap. Cut a thick, heavy-duty wooden board (at least 1.5 inches thick) to fit the space exactly.
- Step 2: Locate Wall Studs. Use a stud finder to locate the wooden studs inside your drywall. Mark these spots with a pencil.
- Step 3: Mount Heavy-Duty L-Brackets. Screw heavy-duty steel L-brackets directly into the wall studs using a spirit level to ensure they are perfectly straight.
- Step 4: Secure the Countertop. Place your wooden board onto the brackets and screw them together from underneath. You now have a floating DIY coffee station counter top that keeps your floor area 100% open for trash bins or pet bowls.
4. The No-Drill Rolling Method (Renter-Friendly DIY Coffee Bar)
Estimated time: ⏱️ 30 minutes
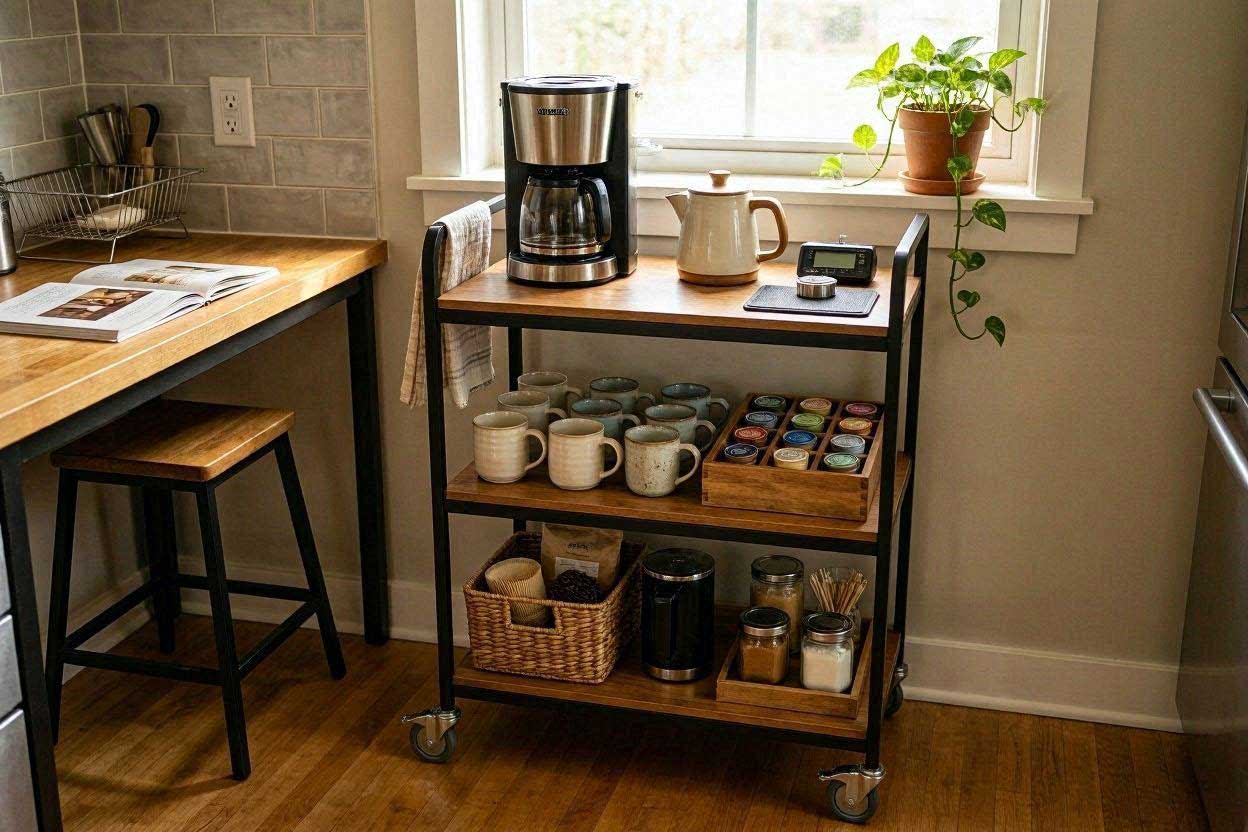
If you live in a rental apartment and face strict rules against drilling holes into the walls, this zero-damage mobile setup is your absolute best friend.
- Step 1: Source a Slim Rolling Cart. Buy a narrow, 3-tier metal or plastic utility cart that can slide easily into any tight gap next to your refrigerator or counter.
- Step 2: Line the Shelves. Cut non-slip silicone drawer liners or thin cork sheets to fit inside the cart baskets. This prevents your ceramic mugs and glass syrup bottles from rattling or sliding when you move the cart.
- Step 3: Route the Power Cord Safely. Place your coffee maker on the top shelf. Use reusable Velcro cable ties to wrap the machine’s power cord neatly down one of the cart’s structural legs so it doesn’t get caught in the wheels.
- Step 4: Keep It Mobile. This renter-friendly DIY coffee bar can sit tucked away in a corner and easily roll closer to your kitchen table or a power outlet whenever you are ready to brew.
📦 Maximize the Storage: 3 Easy DIY Accessories
Building the base table or shelf is just the first half of the project. To make a truly efficient DIY coffee station with storage, you need to think about the small details—like where your mugs go, how to organize your filters, and how to store your coffee pods without creating a messy pile on the counter.
Here are three simple, budget-friendly accessory projects you can build in less than an hour:
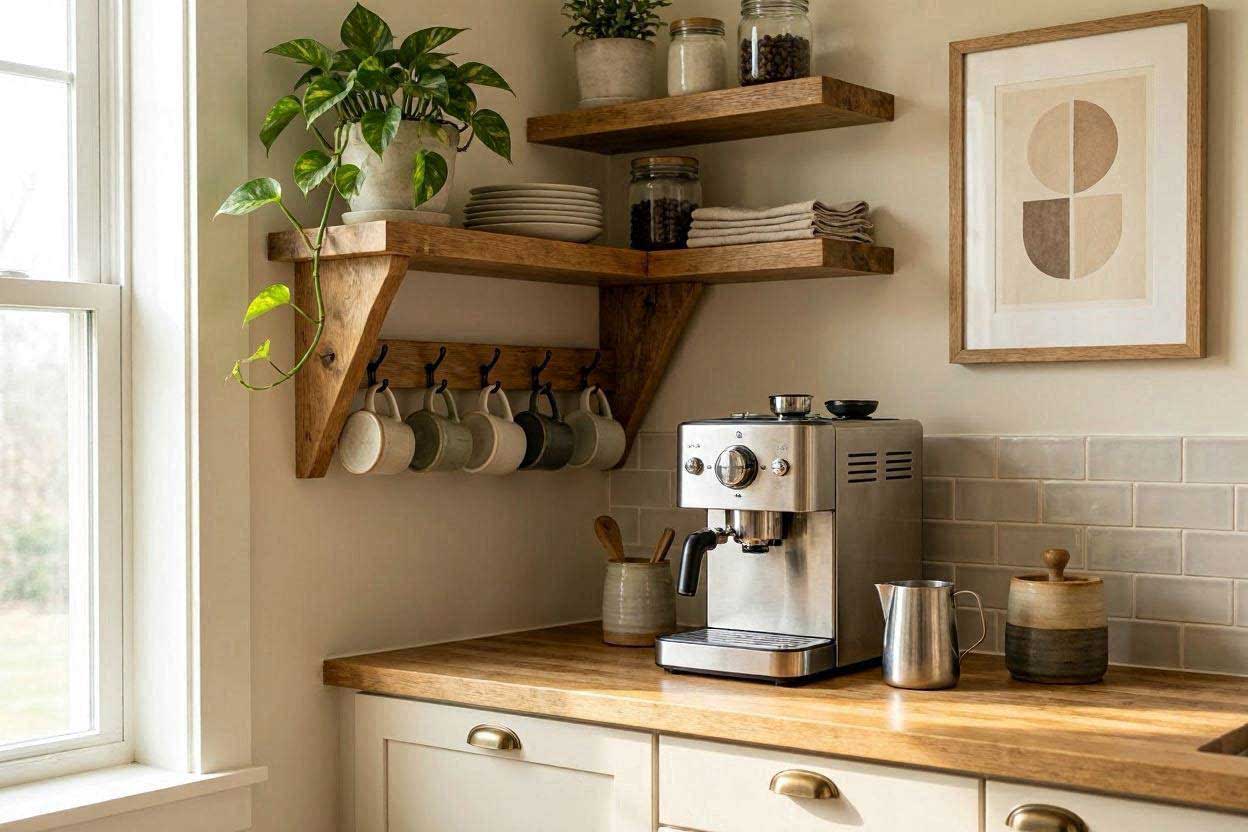
1. The Under-Shelf Hook System (DIY Coffee Mug Rack Wall Mounted)
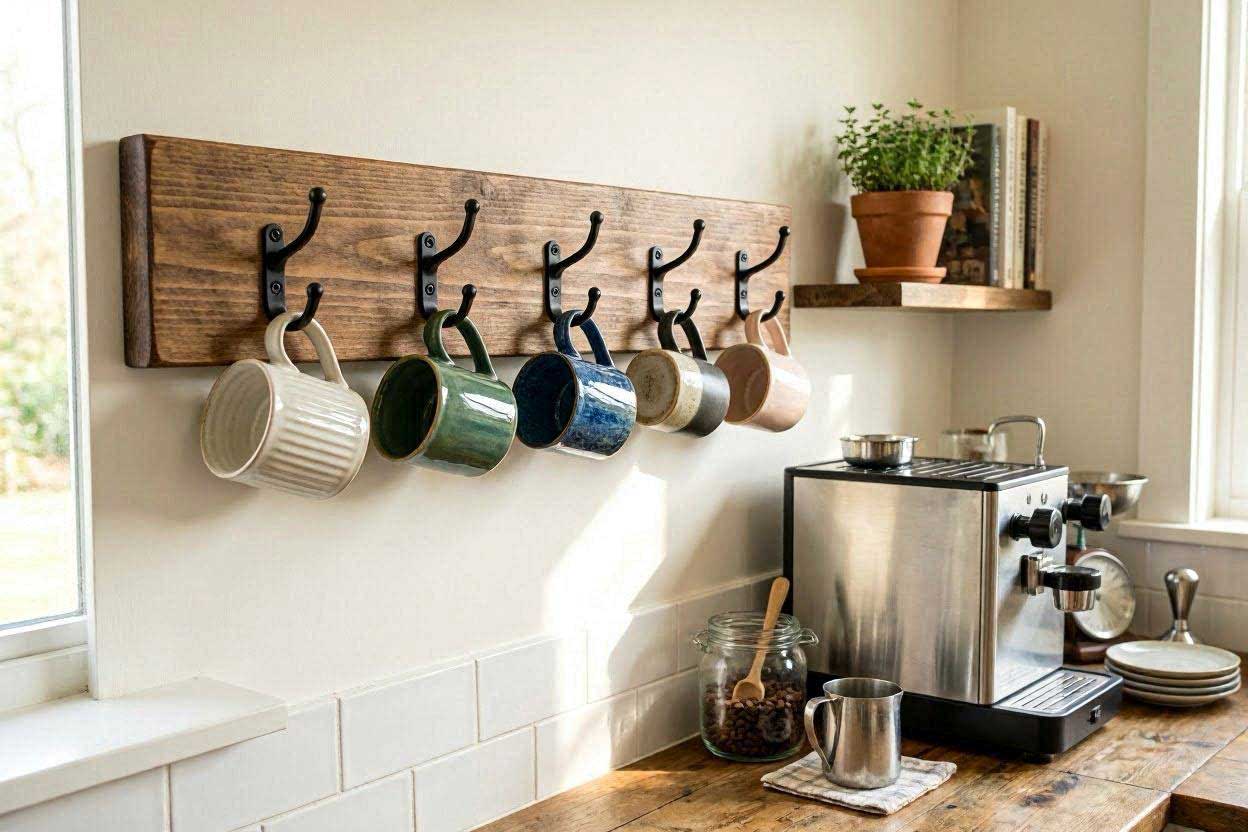
If your countertop corner is tiny, hanging your coffee mugs vertically is the quickest way to free up valuable real estate. Instead of buying an expensive mug tree, you can build a sleek, minimalist wooden rack.
- Step 1: Prep a Wood Strip. Find a thin strip of scrap wood (about 2 inches wide and as long as your coffee station base). Sand it smoothly and stain or paint it to match your main counter shelf.
- Step 2: Screw in Cup Hooks. Mark even spacing along the wood strip (about 4 to 5 inches apart so the mug handles don’t bump into each other). Screw metal C-shaped cup hooks into the marked spots by hand.
- Step 3: Mount the Rack. Screw the wood strip directly into your wall studs above your coffee maker, or mount it underneath an existing upper kitchen cabinet. You now have a custom DIY coffee mug rack wall mounted that displays your favorite mugs like a boutique cafe.
2. Upcycled Glass Storage Jars (Homemade Coffee Bar for Small Spaces)
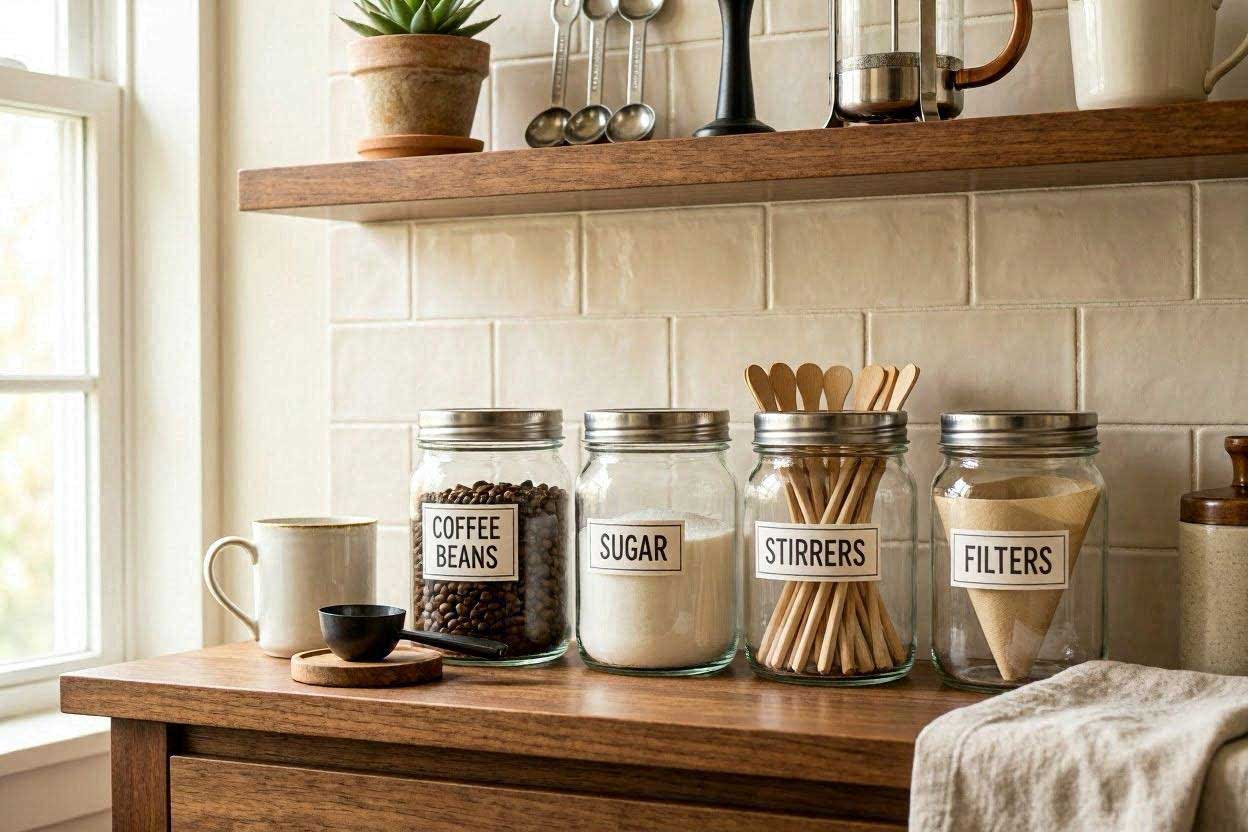
Don’t waste money buying pricey airtight containers for your coffee filters, sugar cubes, and stirrers. You can easily repurpose glass jars from your grocery shopping.
- Step 1: Clean and De-label. Save large glass jars from pasta sauce, pickles, or jam. Soak them in warm, soapy water to peel off the paper labels completely. Use rubbing alcohol or baking soda paste to scrub away any sticky glue residue.
- Step 2: Paint the Lids. To make a mismatched collection of jars look like a premium, cohesive set, paint all the metal lids the exact same color. Matte black, brushed gold, or crisp white work beautifully.
- Step 3: Add Custom Labels. Use a cheap label maker, chalkboard stickers, or a permanent paint pen to write “Filters,” “Sugar,” or “Spoons” on the front of each jar.
💡 For the freshest flavor, wash and dry reused jars thoroughly before storing coffee beans or ground coffee, and make sure the lids seal tightly to reduce exposure to moisture.
3. The Hidden Drawer Tray (DIY Coffee Pod Holder Ideas)
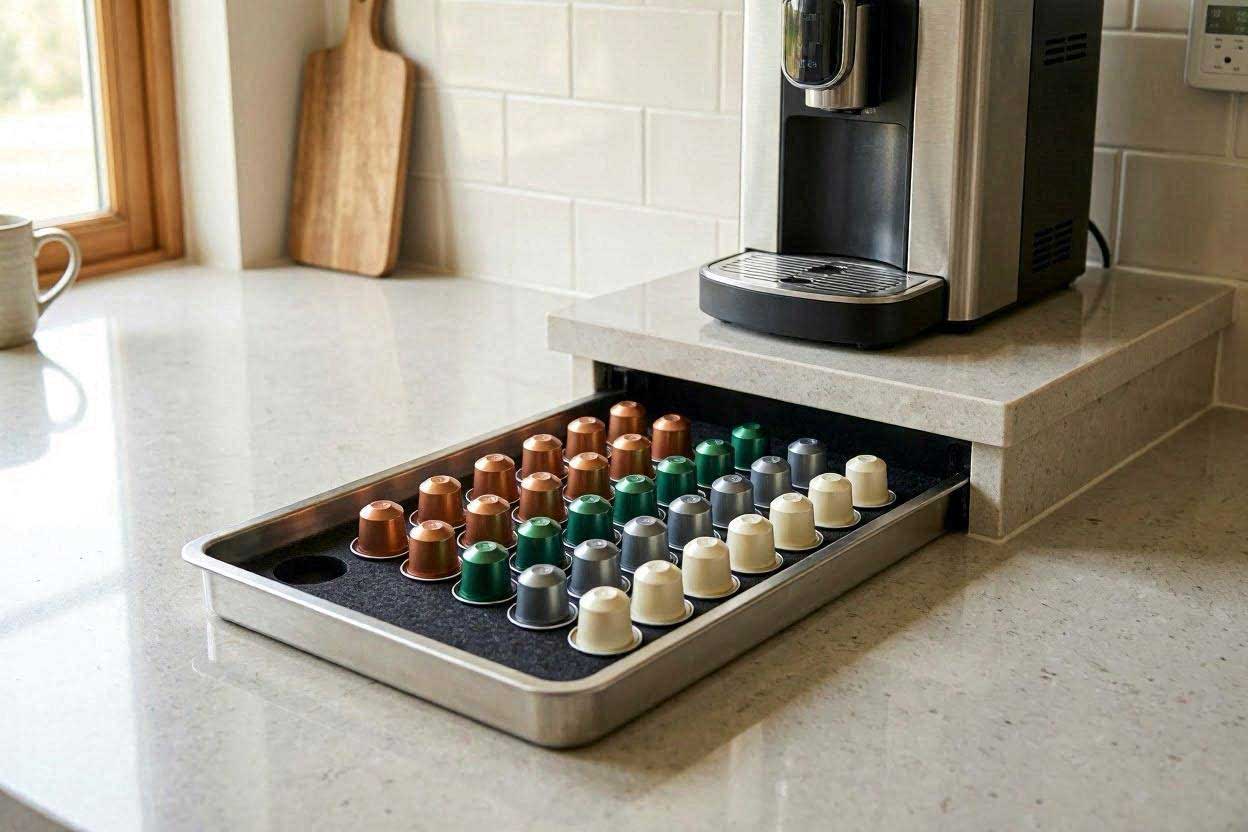
If you use a capsule-based machine like a Nespresso or Keurig, coffee pod boxes can take up a massive amount of counter space. Here is a clever way to keep them accessible but completely hidden.
- Step 1: Find a Flat Baking Pan. Buy a cheap, shallow metal baking pan or a flat wooden breakfast tray that is wide enough for your coffee maker to sit on top of.
- Step 2: Create Pod Channels. Cut strips of thick cardboard or thin balsa wood to fit the inside width of the pan. Glue them down using a hot glue gun to create rows or “channels” that match the width of your coffee pods.
- Step 3: Stack and Slide. Place your coffee pods neatly in lines inside the channels. Slide the entire tray directly underneath your coffee machine. This DIY coffee pod holder ideas hack uses the dead space right under your machine, keeping your pods organized and your counter clean.
Once you’ve built the foundation, organizing supplies efficiently becomes just as important. Check out these coffee station storage ideas for small kitchens for even more space-saving inspiration.
⚠️ 4 Common Mistakes to Avoid in DIY Setups
Building your own DIY small kitchen coffee station is an incredibly rewarding weekend project, but it is easy to make a few technical mistakes if you are rushing. To ensure your homemade station is safe, durable, and highly functional, make sure to avoid these four common pitfalls:
- Using the Wrong Wood Sealant: Coffee and water spills are inevitable. If you leave your DIY coffee station counter top as raw wood or only use a basic water-based paint without a protective topcoat, the wood will warp, swell, and develop dark, permanent mold stains within a few months. Always seal the surface with at least two coats of water-resistant polyurethane or polycrylic sealer.
- Overloading Wall Anchors: A heavy espresso machine full of water, combined with a DIY coffee mug rack wall mounted holding multiple ceramic mugs, adds up to a significant amount of weight. Never screw heavy shelves directly into bare drywall. If you cannot align your brackets with a wooden wall stud, you must use heavy-duty toggle bolts or metal hollow-wall anchors to prevent the shelves from collapsing.
- Ignoring Heat and Steam Clearance: Many coffee makers release a large burst of steam from the top or back during the brewing cycle. If you build your station with floating shelves that sit too low or close directly above the machine, the constant hot moisture will eventually ruin the paint on your shelves and cause mold growth on your kitchen walls. Leave at least 6 to 8 inches of open space above your machine’s steam vent.
- Creating a Fire Hazard with Extension Cords: Coffee makers and espresso machines draw a very high amount of electrical wattage to heat water quickly. Plugs should go directly into a permanent wall outlet. If you must use an extension cord for your DIY coffee station table, ensure it is a heavy-duty, thick appliance cord rated for high wattage, and never daisy-chain multiple power strips together in a tight, unventilated corner.
❓ Frequently Asked Questions
How do you make a cheap DIY coffee bar look expensive?
The secret to making cheap DIY coffee bar ideas look premium lies in the details. Swap out standard hardware for modern matte black or brushed brass handles, paint all your accessory jar lids the exact same uniform color, and use a consistent color palette (like warm wood tones mixed with clean whites or dark charcoal). Adding a tiny potted plant or a wireless LED strip light under the shelf also instantly elevates the space.
What is the best wood type for a DIY coffee station counter top?
For a sturdy and budget-friendly option, look for thick pine or rubberwood project boards at your local hardware store. If you want maximum durability against water and scratches, hardwoods like oak, walnut, or butcher-block maple off-cuts are excellent choices, though they will cost a bit more.
Can I build a renter-friendly DIY coffee bar without drilling holes?
Yes! A renter-friendly DIY coffee bar can be easily built using a heavy-duty rolling utility cart or a slim, freestanding kitchen hutch that sits firmly on the floor. For vertical mug storage, you can use damage-free adhesive utility hooks rated for heavy weight on smooth tile backsplashes instead of drilling screws into the wall.
Working with an especially tight layout? You may also enjoy these narrow coffee station ideas for tiny kitchens, featuring clever solutions designed for slim spaces.
Conclusion
Creating a DIY coffee station for small kitchen spaces proves that you don’t need a massive budget or a giant kitchen island to enjoy a beautiful, organized morning routine. By using smart cheap DIY coffee bar ideas, upcycling secondhand furniture, or utilizing clever IKEA hack coffee station tricks, you can design a custom cafe nook tailored perfectly to your home’s exact layout.
Take it one step at a time, measure carefully, and seal your surfaces well. Before you know it, that once-cluttered or empty corner will become your absolute favorite place to start the day.
Ready to tackle this weekend project? Pin this guide to your favorite DIY Home Decor or Kitchen Organization board on Pinterest so you can reference these steps later!
Royan Abdillah is a home improvement enthusiast and interior design consultant with over 9 years of experience in the industry. Passionate about blending aesthetics with functionality, Royan Abdillah specializes in unique DIY furniture and pet-friendly home solutions. Through this blog, Royan Abdillah aims to help homeowners create beautiful, personalized spaces on a budget.